Bitbucket is popular for it's services and it stands out among other version control repository hosting services because of Bitbucket Pipelines. Bitbucket Pipelines is an Integrated Continuous Delivery/Continuous Integration feature for Bitbucket Cloud. (See Bitbucket Pipelines).
If you are using some other Continuous Integration Server, you can integrate vREST with that easily similar to Jenkins, TeamCity etc. If you face any issues then do let us know by dropping an email to support@vrest.io
vREST can also be integrated with Bitbucket Pipelines using vrunner (command-line utility for running vREST Test Cases). So, following are the steps to configure vrunner into Bitbucket Pipelines.
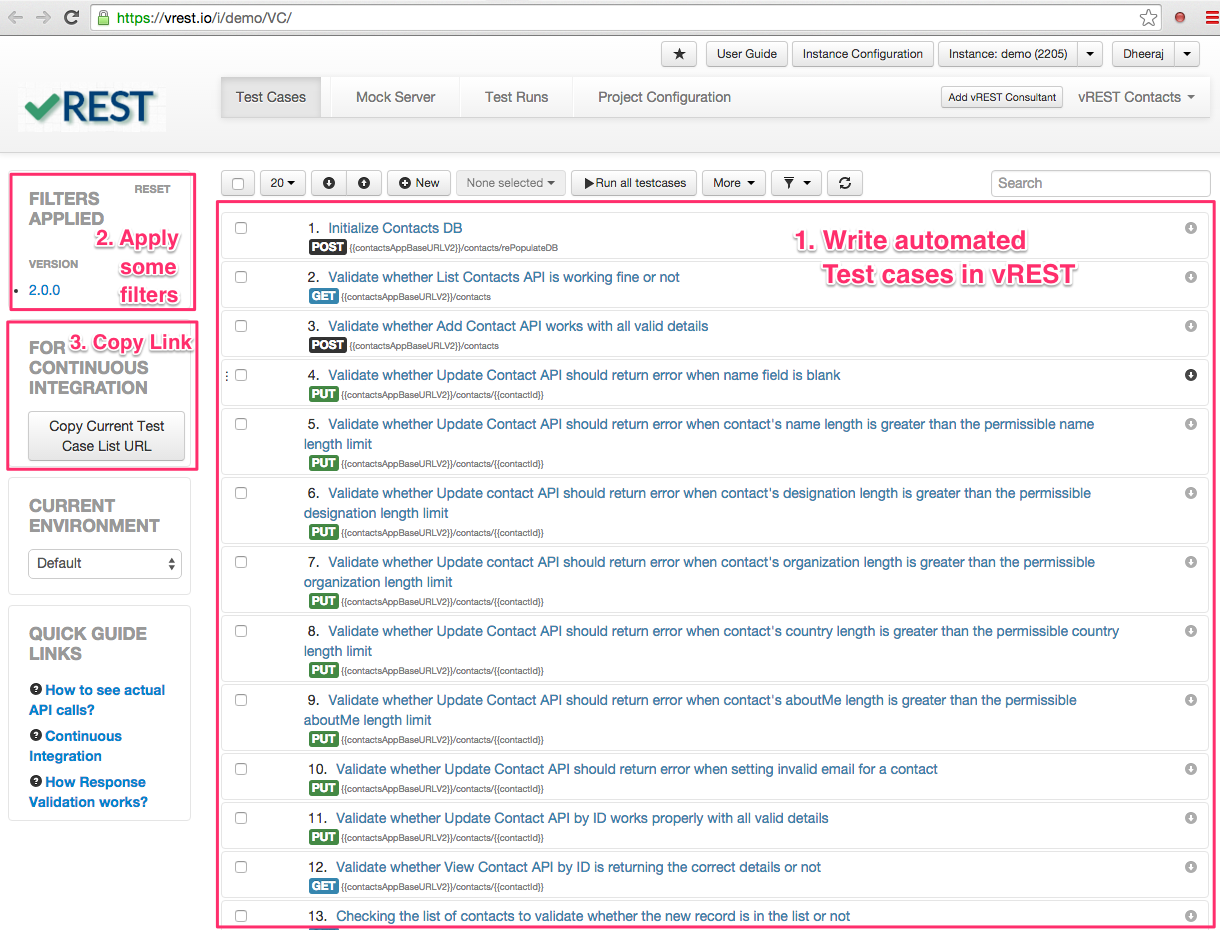
Step 1: Write your automated test suite in vREST First you need to write test cases for your test application in vREST to ensure the build quality of your web application. Then copy the test case list URL by clicking on button "Copy Current Test Case List URL" available in Continuous Integration section. You can find the test cases for this sample application in vREST here. First setup the vrunner module by following the guide Setup / install vrunner. Once you setup this module on your local machine, you can execute the vREST test cases by executing the following command:Step by Step Guide:
Step 2: [Optional] Learn how vrunner command works and get your hands dirty on it by installing it locally first
vrunner --email=<EMAIL_ID> --password=<PASSWORD> --url=<URL OF vREST Test Cases> --logger=xunit [--filepath=<absolute log file path>] [--env=<ENVIRONMENT>]
Options
Step 3: Creating bitbucket-pipelines.yml
To setup Bitbucket Pipelines, you have to create a bitbucket-pipelines.yml file and save it into the git directory of your project. Here is a sample bitbucket-pipelines.yml for a node.js project:
bitbucket-pipelines.yml# You can use any other version of node. This is only required in the case of a node.js application. image: node:6.9.4 pipelines: default: - step: caches: - node - vrunnercache script: # Modify the commands below to build your repository. - node server.js & #Deploy and start your Test application Server - if [ ! -e "vrunner/vrunner_linux_x_x_x" ]; then wget -O vrunner/vrunner_linux_x_x_x https://s3.amazonaws.com/vrest-public/vrunner_linux_x_x_x ; fi - chmod +x vrunner/vrunner_linux_x_x_x - vrunner/vrunner_linux_x_x_x --email=<EMAIL> --password=<PASSWORD> --logger=xunit --filepath="test-reports/logs.xml" --url="<URL>" definitions: caches: vrunnercache: vrunner
- Content of bitbucket-pipelines.yml: The above mentioned bitbucket-pipelines.yml has the commands that are to be run at the build. Here is an explanation to those commands:
- First of all, we have added the node image with the specified version.
- Then, we are mentioning node and vrunnercache as cache. This is done to save build time.
- Then, comes the scripts:
- 'node server.js' command deploys and starts the node.js application server.
- The next command is used to download the vrunner binary. In vrunner_linux_x_x_x, the 'x's are used to show the version of vrunner. It is recommended that you use the latest version of vrunner.
- Then, the downloaded vrunner binary is being given the executable permissions.
- Then, the vrunner command to run your vREST Test Cases and generate test reports is executed. (I am assuming that you have already created your vREST Test Cases by now)
Step 3: Running Pipelines
.png?version=1&modificationDate=1534243920018&cacheVersion=1&api=v2&width=800&height=450)
- After you have setup bitbucket-pipelines.yml, you are ready to go. To see the Pipelines running you just have to commit the changes and push it to your Bitbucket repository.
Step 4: Test Reports Generation on Failure
.png?version=1&modificationDate=1534243965261&cacheVersion=1&api=v2&width=800&height=450)
- In the bitbucket-pipelines.yml we have mentioned --logger=xunit and --filepath="test-reports/logs.xml" so that xml test reports can be generated and can be tracked by Bitbucket at the given filepath.
That is all for vREST's integration with Bitbucket Pipelines. If you have any issues, then feel free to contact us on the Customer Support.