Migration Utility on Windows Operating System
- Deepak Jangid (Deactivated)
- All (Deactivated)
WARNING: This utility is still in beta. Please inform us before using this utility.
Migration utility can be used to backup & restore RMsis database from one JIRA+RMsis instance to another. It can also be used to switch from one database type to another (H2/MySQL/Postgres/Oracle/SQL Server).
At present, this utility is compatible with RMsis v1.8.8-r301, RMsis v1.8.8.2-r304, RMsis v1.8.8.4.1-r311, RMsis v1.8.9.1.1-r324, RMsis v1.8.9.2-r330.
- In case you are using an older version, please update your RMsis to one of the above mentioned version.
- If the version being used by you is latest but it is not listed here, please let us know. We will send the updated version of this utility.
Please note that some changes are expected for different versions of RMsis.
Pre-Requisites:
Download and install JAVA 1.8 and set the JAVA_HOME Variable.
Shut down JIRA before taking the database dump.
Steps to create the dump of existing database:
Download the migration utility(migrateutil-1.0.0-RC-07.tar) and store it on the JIRA+RMsis server. (Please send a mail to support@optimizory.com to get the link to download the utility)
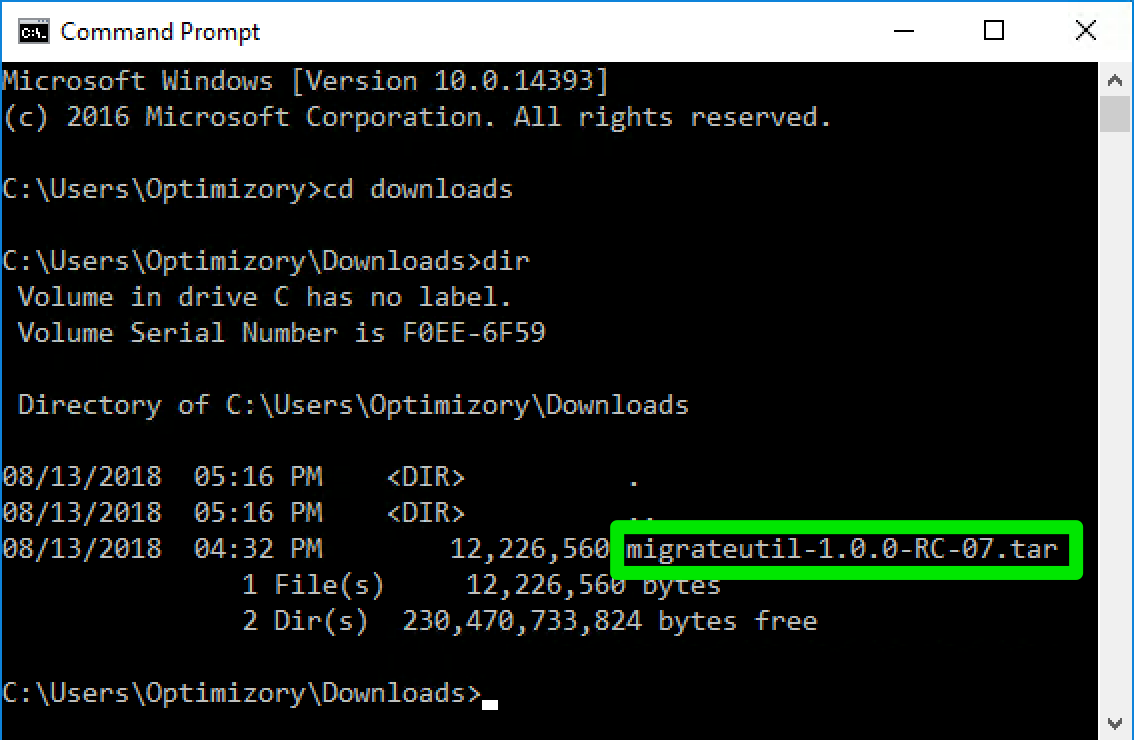
Here, migrateutil-1.0.0-RC-07.tar is stored in the "C:\Users\Optimizory\Downloads" directory.
Extract the contents of the tar file using an archival tool like 7-zip, Winzip, Winrar or TarTool.
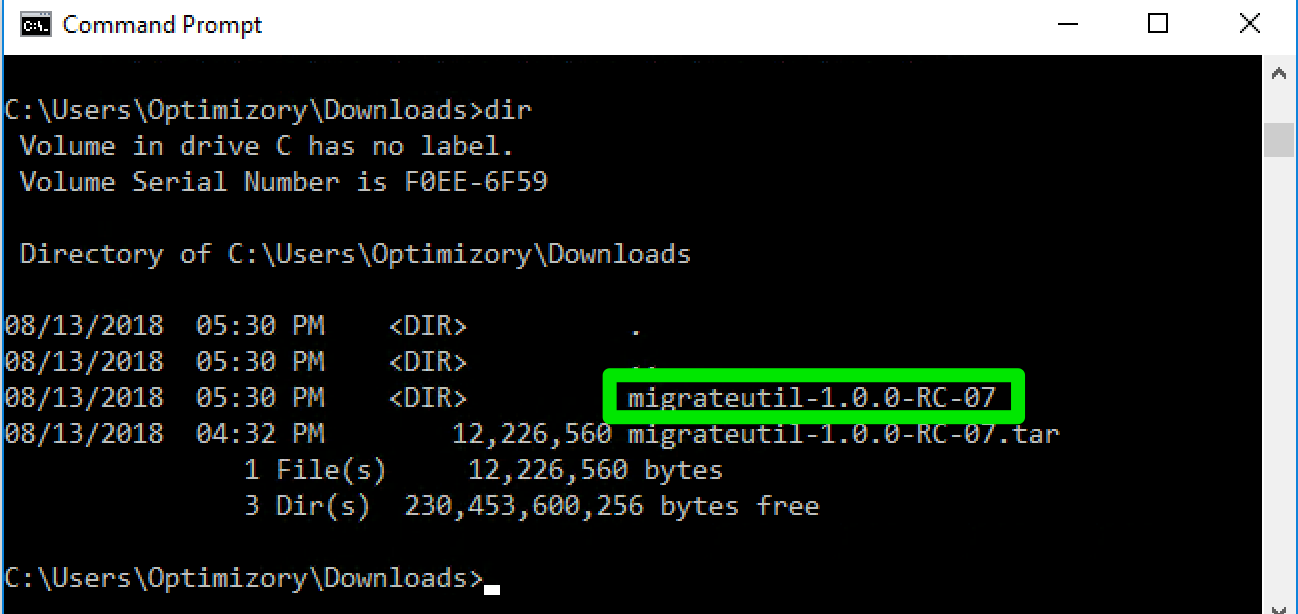
A directory with name "migrateutil-1.0.0-RC-07" will be created.
Switch to the directory migrateutil-1.0.0-RC-07 and create a directory with name "backup" where the contents of the existing database will be dumped.
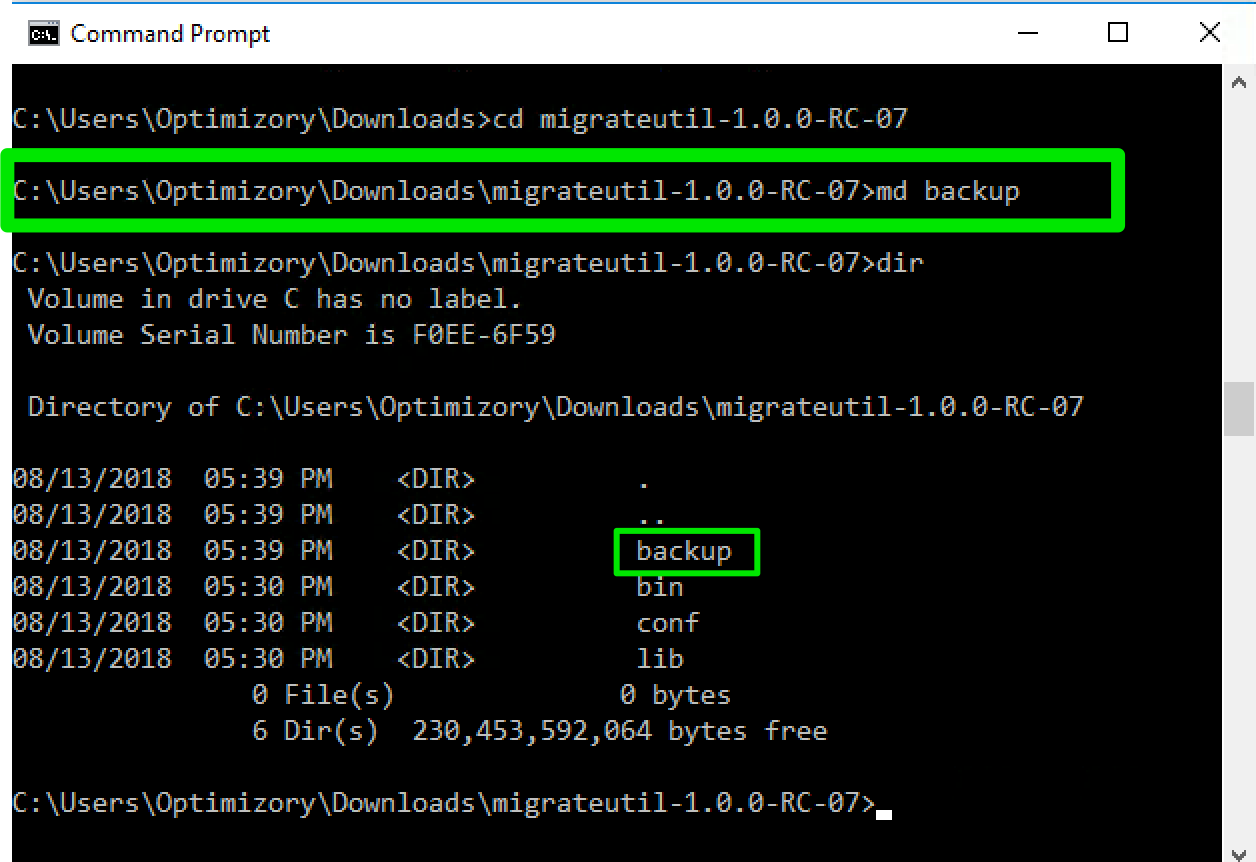
- Here, a directory named "backup" is created which will be used later to store the database backup.
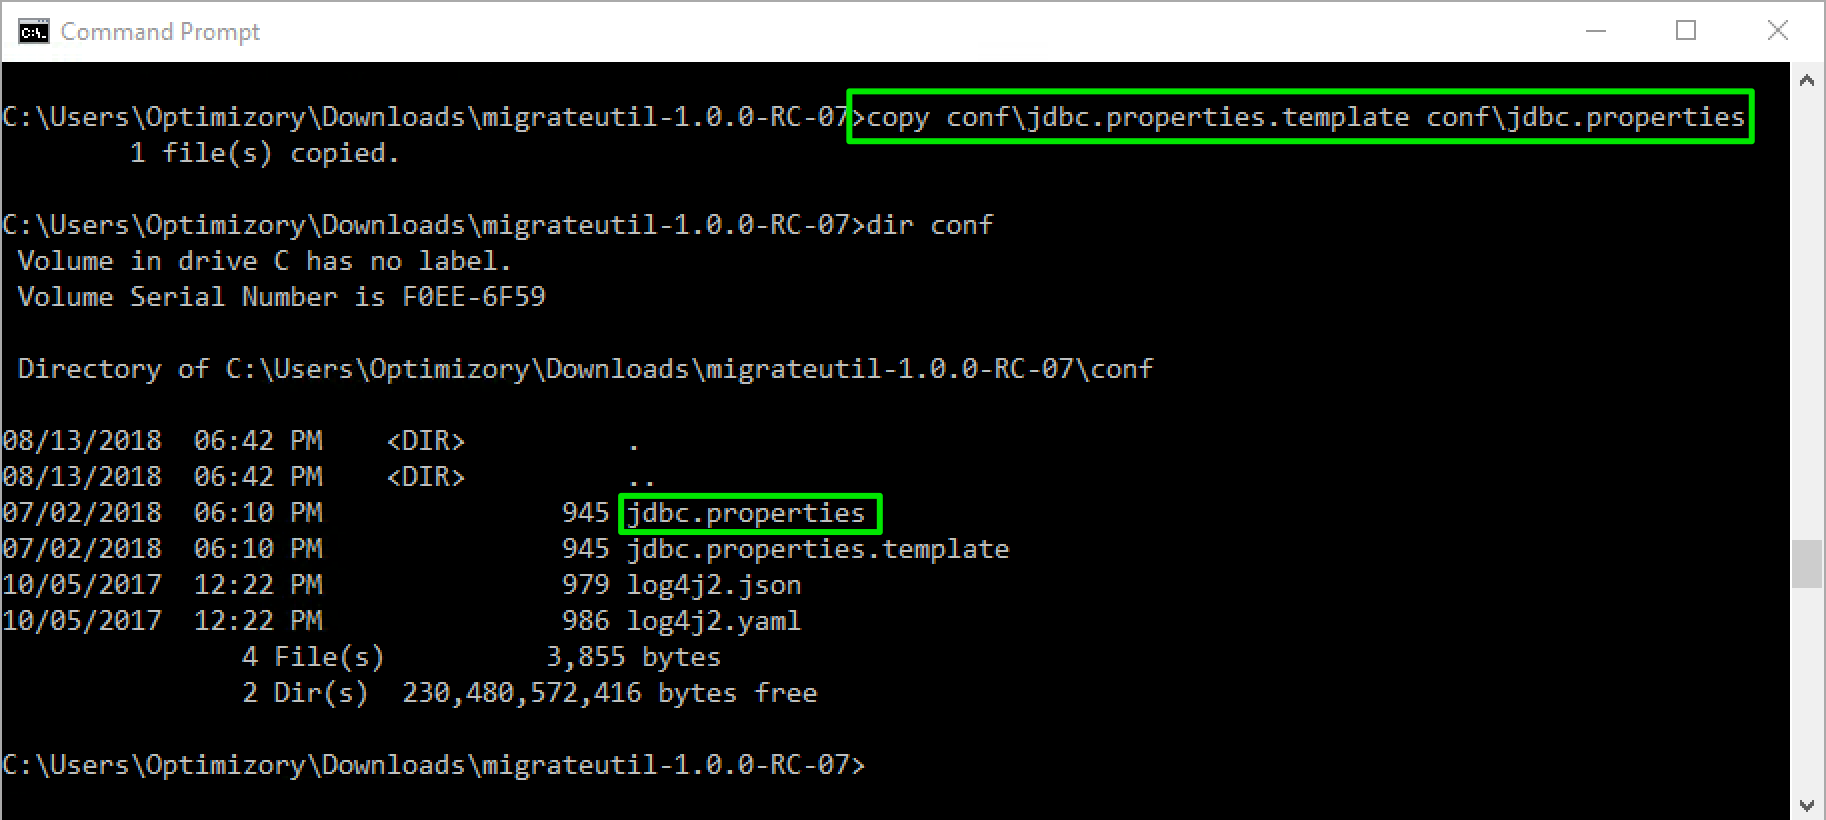
- Create a copy of the file migrateutil-1.0.0-RC-07\conf\jdbc.properties.template and save it with the name "jdbc.properties" and then open it in the text editor.
- The contents of the jdbc.properties file is displayed in the image attached below:
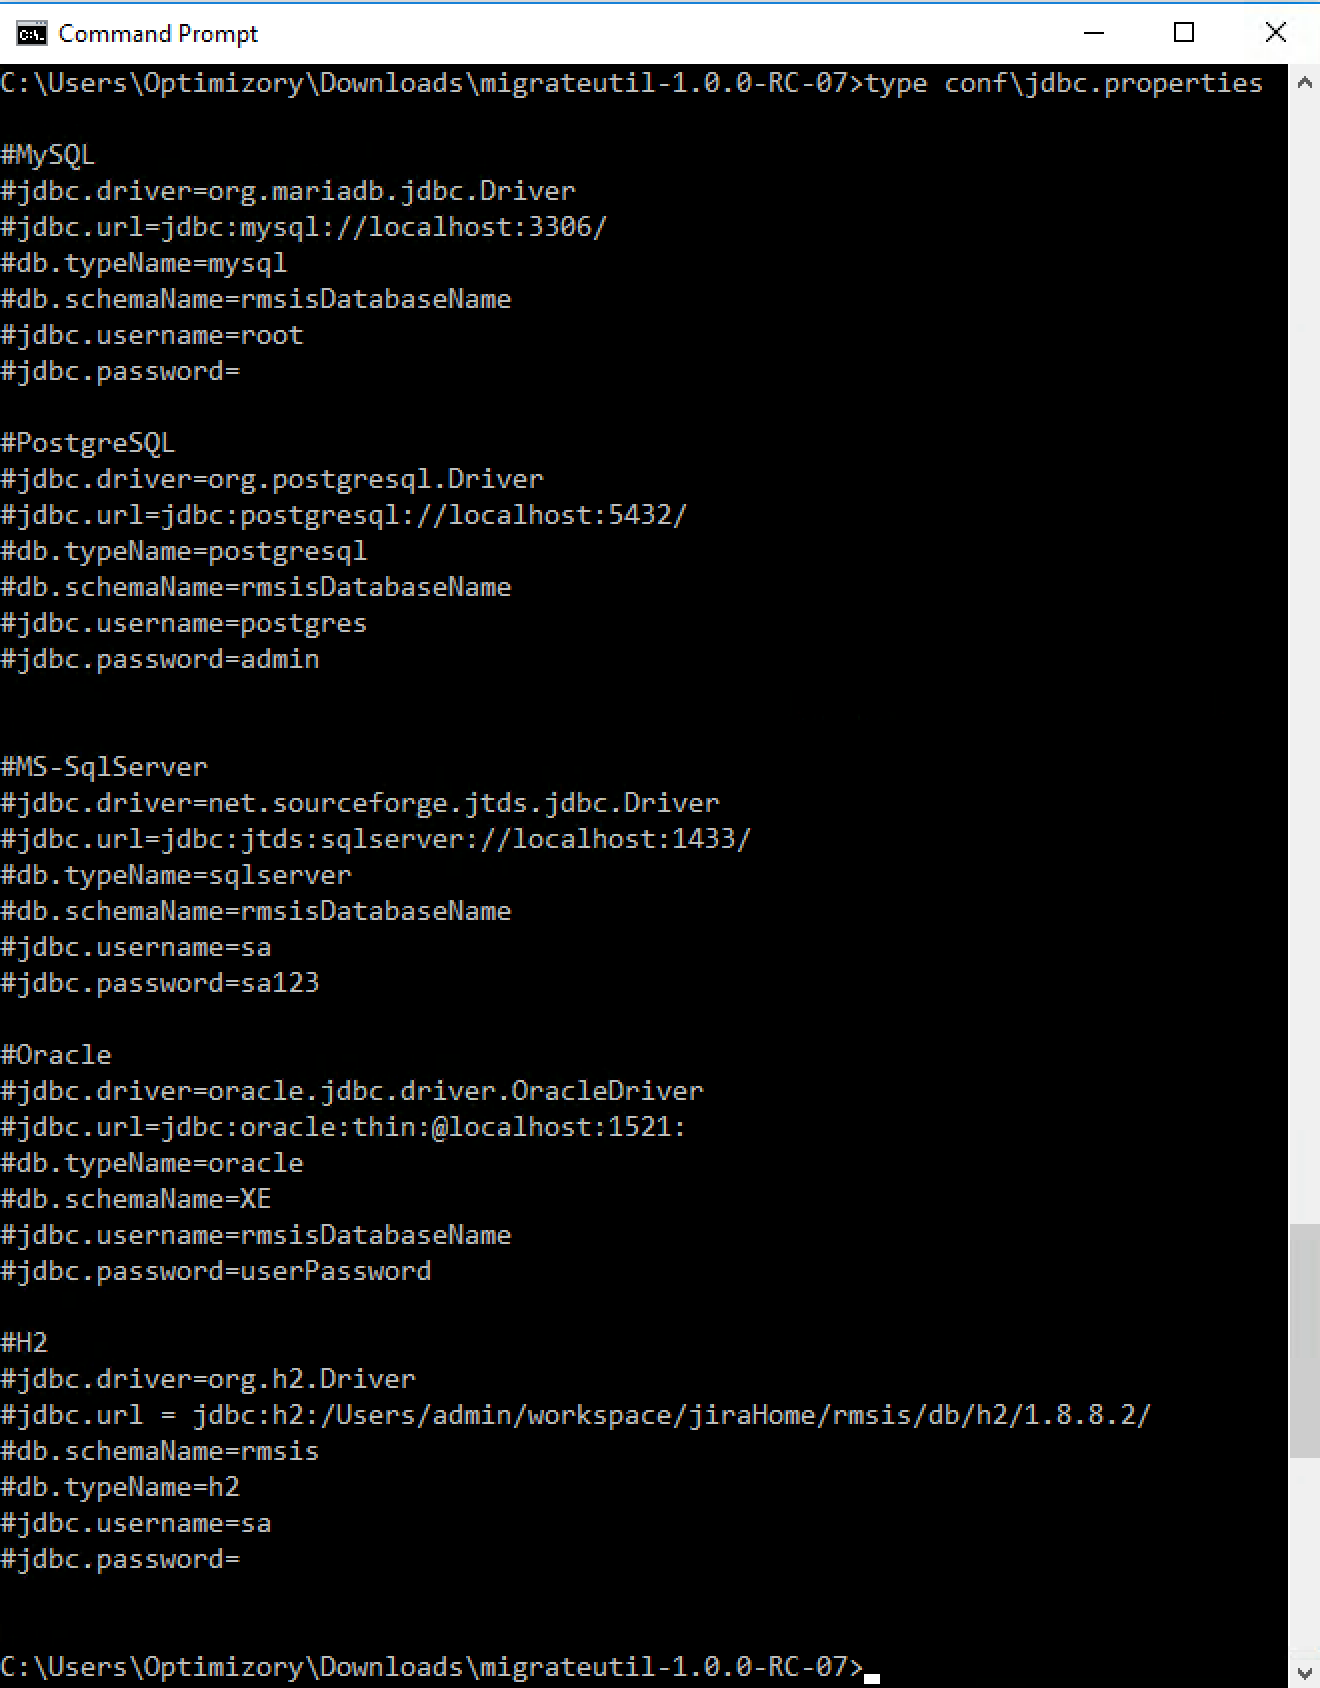
- The newly created file will be used by the utility to access the RMsis database. You will have to update the database connection details in the file. The following properties needs to be uncommented and updated:
- jdbc.driver: Uncomment this field and leave it's value to default (as already present in the jdbc.properties file). This field is used to identify the jdbc driver used to connect to RMsis database.
- jdbc.url : Uncomment this field and update the IP address and port number of the database server if required.
- db.typeName : Uncomment this field and leave it's value to default. This field is used to identify the type (H2/MySQL/PostgreSQL/Oracle/SQL Server) of database in use with RMsis.
- db.schemaName : Uncomment this field and replace rmsisDatabaseName with the name of the database being used for RMsis.
- jdbc.username: Uncomment this field and and replace it with the username used to connect to RMsis database server.
- jdbc.password: Uncomment this field and replace it with the password used to connect to RMsis database server.
Note: To uncomment a field, remove the "#" symbol at the beginning of the field name.
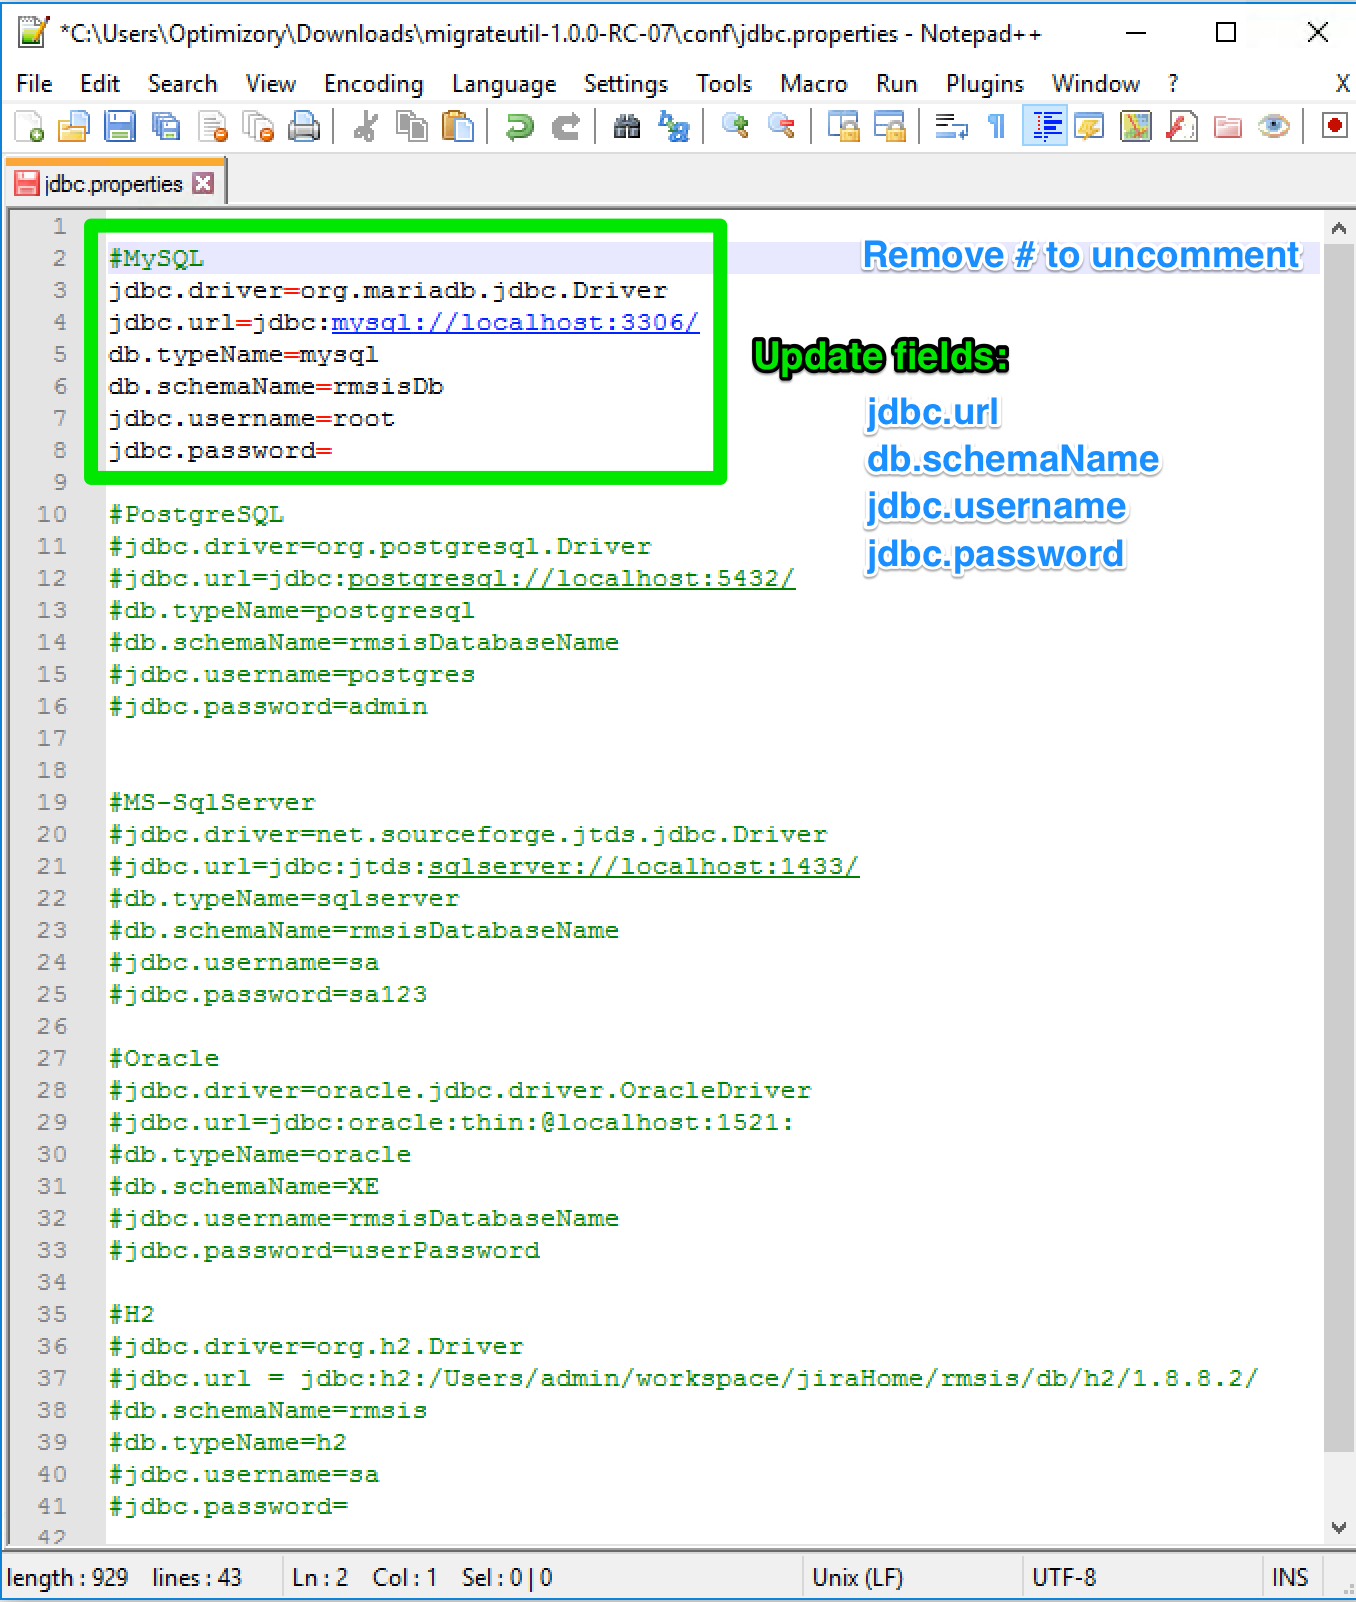
- For example, if you are using a MySQL database with RMsis having name "rmsisDb". The content of the updated file will look like the image mentioned below:
Execute the migration utility using the following command to dump the database content:
-b switch is used to specify the location of the directory where the backup will be stored, here it is the location of the "backup" directory created in step 3.
-v switch is used to specify the version of RMsis presently in use. Here, it is v1.8.8-r301. Format used: v<RMsisVersionNumber>-r<RMsisBuildNumber>
-j switch is used to specify the location of the jdbc.properties file created and updated in step 4 & 5.
dump is the name of the command which directs migration utility to create the backup of RMsis database
Command to create the backup using migration utilityC:\Users\Optimizory\Downloads\migrateutil-1.0.0-RC-07>
bin\migrateutil.bat -b C:\Users\Optimizory\Downloads\migrateutil-1.0.0-RC-07\backup -v v1.8.9.1.1-r324 -j C:\Users\Optimizory\Downloads\migrateutil-1.0.0-RC-07\conf\jdbc.properties dump
Example:C:> bin\migrateutil.bat -b .\backup -v v1.8.9.1.1-r324 -j .\conf\jdbc.properties dumpC:> bin\migrateutil.bat -b C:\Users\Optimizory\Downloads\migrateutil-1.0.0-RC-07\backup -v v1.8.9.1.1-r324 -j C:\Users\Optimizory\Downloads\migrateutil-1.0.0-RC-07\conf\jdbc.properties dump
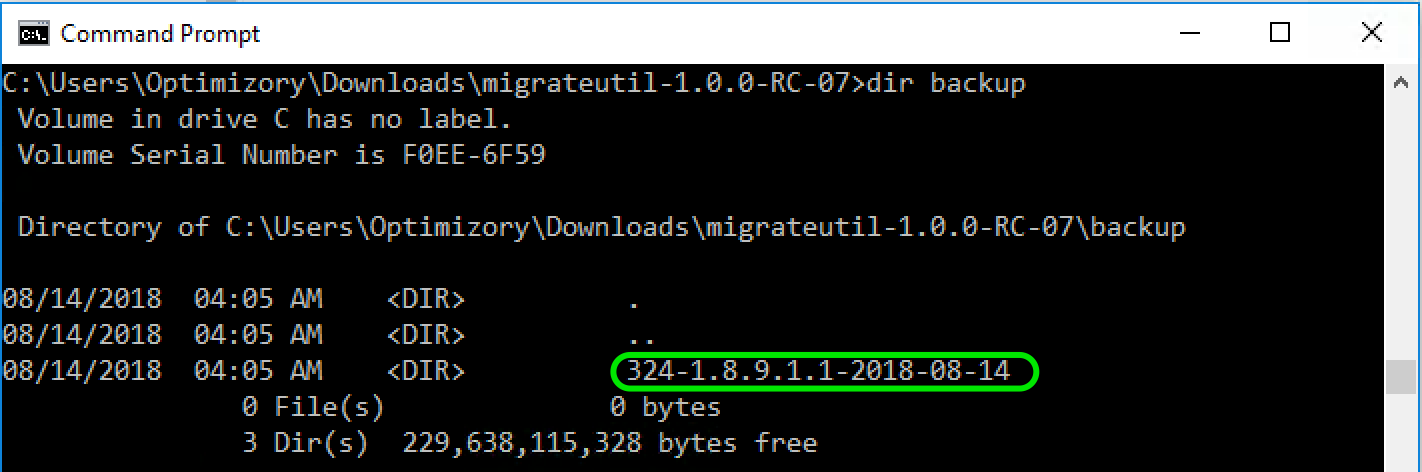
Upon successful execution, the database content will be dumped in the directory specified to create the backup using the -b switch. Here, a directory named "324-1.8.9.1.1-2018-08-14" is created inside the "C:\Users\Optimizory\Downloads\migrateutil-1.0.0-RC-07\backup" directory.
Copy the backup folder on the destination server. The contents of this folder will be used to restore the RMsis data on destination database.
Steps to restore the backup to new database:
- Same as step 1 of "Steps to create the dump of existing database"
- Same as step 2 of "Steps to create the dump of existing database"
- Same as step 3 of "Steps to create the dump of existing database"
- Same as step 4 of "Steps to create the dump of existing database"
- Same as step 5 of "Steps to create the dump of existing database"
- Alternatively, if the destination database is on the same machine/network. Skip steps 1-4 and Switch to step 5.
- For example, if the target database is a PostgreSQL database having name "rmsisRestoredDb". The content of the updated file will look like the image mentioned below:
- Copy the contents of the backup folder created after executing the dump command onto the destination server.
- If the destination database is on the same machine/network, skip this step as the data is already available.
- Execute the migration utility using the following command to restore the database content:
-b switch is used to specify the location of the directory where the backup of previous data is stored, here it is the location of the "backup" directory created in step 3 and backup data was copied in step 6.
-v switch is used to specify the version of RMsis presently in use. Here, it is v1.8.8-r301. Format used: v<RMsisVersionNumber>-r<RMsisBuildNumber>
-j switch is used to specify the location of the jdbc.properties file created and updated in step 4 & 5.
restore is the name of the command which directs migration utility to restore the backup of old RMsis database into destination database.
Command to restore the backup using migration utility
C:\path\to\migrationUtility\migrateutil-1.0.0-RC-07>
bin\migrateutil.bat -b C:\path\to\migrationUtility\migrateutil-1.0.0-RC-07\backup -v v1.8.9.1.1-r324 -j C:\path\to\migrationUtility\migrateutil-1.0.0-RC-07\conf\jdbc.properties restore
Example:C:> bin\migrateutil.bat -b .\backup -v v1.8.9.1.1-r324 -j .\conf\jdbc.properties restoreC:> bin\migrateutil.bat -b C:\Users\Optimizory\Downloads\migrateutil-1.0.0-RC-07\backup -v v1.8.9.1.1-r324 -j C:\Users\Optimizory\Downloads\migrateutil-1.0.0-RC-07\conf\jdbc.properties restore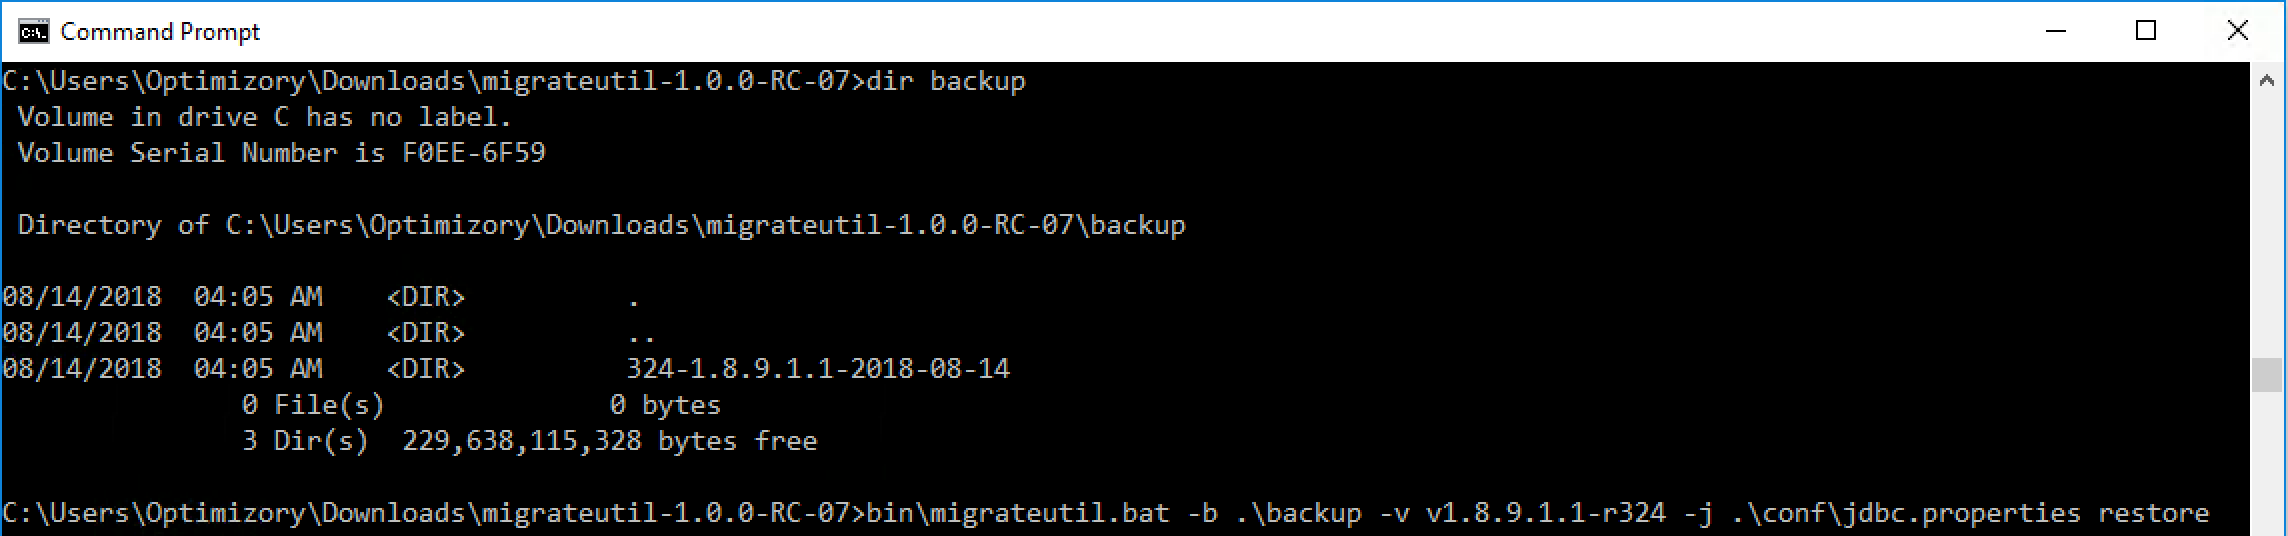
- Upon successful execution, the database content will be restored to the destination database.

NOTE:
The user preferences like column arrangement and ordering is not migrated. As a result of this, the UI will reset after migration and users will have to re-arrange the views once again.