Database Setup
- Deepak Jangid (Deactivated)
- Pritam Kumar
- Sonu Kumari
RMsis requires it's own independent database. This section contains instructions for setting up all the supported versions of Databases.
Important note regarding Unicode support
A word before you start your DataBase Configuration ...
- Please make sure that you create Unicode compliant database, so that you will not need an explicit migration anytime in future.
- The suggested MySQL example in next section, creates a UTF-8 compliant Database.
- Regarding SQL Server, please refer to the Atlassian Guide for suggestions on configuring the character encoding.
MySQL
- Open a unix terminal or a windows command prompt whichever is relevant to you. And login to MySQL database using the command line client that is shipped with the MySQL. Use "root" (administrator) credentials to login.
- Create a database to store RMSis data. Use any name for it. Example - "rmsis".
- Create a database user and assign permissions to this user to access the database created above.
- Exit MySQL
$ mysql -uroot -ppassword
mysql> create database rmsis character set utf8 ;
mysql> grant all on rmsis.* to 'username'@'hostname' identified by 'new_user_password';
mysql> exit;
Note (known issue) :
Mysql database only supports 3 byte UTF8 characters if the default 'utf8' character set is chosen.
For 4byte UTF8 support, 'utf8mb4' character set needs to be chosen in Mysql. However, 'utf8mb4' character set is not supported by RMsis at present.
This issue is logged as RMI-3474 in our CRM.
- Due to this issue, you may experience unexpected behaviour and/or failure to access RMsis if a 4 byte UTF8 character is entered in a field in RMsis.
PostgreSQL
- Create a database user which RMsis will connect as (e.g. rmsis
dbuser). This user will be used to configure RMsis's connection to this database in subsequent steps. Create a database for RMsis (e.g. rmsis) with Unicode collation.
CREATE DATABASE rmsis WITH ENCODING 'UNICODE';
Or from the command-line:
$ createdb -E UNICODE rmsis
- Ensure that the user has permissions to connect to the database, and to create and write to tables in the database.
Microsoft SQL Server
- Create a database for RMsis (e.g. rmsis). Note that the collation type must be case insensitive, e.g.: 'SQL_Latin1_General_CP437_CI_AI' is case insensitive. If it is using your server default, check the collation type of your server.
- Create a database user which RMsis will connect as (e.g. rmsisuser). Note that rmsisuser should not be the database owner, but should be in the db_owner role.
- Ensure that the user has permission to connect to the database, and create and populate tables in the default schema.
- Ensure that TCP/IP is enabled on SQL Server and listening on the correct port (the port is 1433 for the default instance of SQL Server). Read the Microsoft documentation for information on how to enable a network protocol (TCP/IP) and how to configure SQL server to listen on a specific port.
- Ensure that SQL Server is operating in the appropriate authentication mode. By default, SQL Server operates in 'Windows Authentication Mode'. However, if user is not associated with a trusted SQL connection, i.e. 'Microsoft SQL Server, Error: 18452' is received during RMsis startup, it is required to change the authentication mode to 'Mixed Authentication Mode'. Read the Microsoft documentation on authentication modes and changing the authentication mode to 'Mixed Authentication Mode'
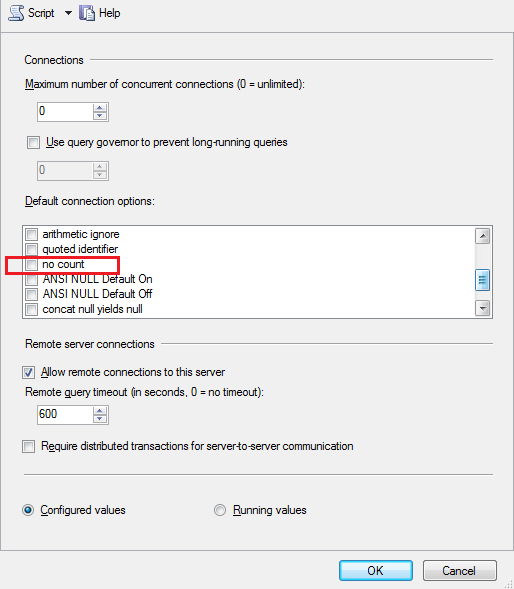
- Turn off the SET NOCOUNT option. Open SQL Server Management Studio and navigate to Tools -> Options -> Query Execution -> SQL Server -> Advanced. The following screenshot displays the configuration panel for this setting in MSSQL Server 2005/2008. Ensure that the SET NOCOUNT option is not selected:

- You will also need to access the Server > Properties > Connections > Default Connections properties box and clear the no count option.
Microsoft SQL Server Authentication Modes
- Windows Authentication mode
- If you want to connect RMsis with Microsoft SQL Server database using windows authentication mode,
- then leave the username and password fields blank while configuring RMsis database during RMsis installation.
- Make sure that the logged in user of windows machine (on which RMsis server is running or will run) has required credentials for RMsis database.
- Download the SQL Server JDBC driver (v1.2.4) from JTDS and place the ntlmauth.dll (shipped with jtds driver) file in the system path
- If you want to connect RMsis with Microsoft SQL Server database using windows authentication mode,
- Mixed Authentication mode (SQL Server and Windows Authentication mode)
- Choose this option, when
- you wish to explicitly configure username and password for Microsoft SQL Server.
- RMsis is running on Linux, and you wish to use SQL Server on a different node.
- When this option is chosen, username and password are required during.RMsis configuration.
- Choose this option, when
Connecting RMsis to named instances in SQL Server
When using named instances in SQL Server, the following configuration can be used in RMsis Database Configuration (after performing the actions specified in above sections) :
- Specify Database Connection : External
- Database Type : MS-SQL
- Hostname : <Hostname or the IP address of the database>
- Port : 1433 <TCP port number of the database server>
- Database : <RMsis_Database_Name>;instance=<Instance_name>
- Username : <Username to access the database>
- Password : <Password to access the database>

- The above settings can also be used when using named instances in SQL Server on dynamic port. Please make sure that SQL Server Browser Service is running if you are using dynamic port.
Securely connect RMsis to a SQL Server database (Connecting to SQL Server database using SSL)
- You can follow the steps mentioned below to securely connect RMsis to a SQL Server database :
- Switch to the database configuration page RMsis Menu > RMsis Configuration > Database Configuration
- Select MS-SQL (Microsoft Driver) from the drop down menu while selecting Database Type.

- Fill appropriate values for other fields in the database configuration page (as mentioned above in this page) and click on TEST AND SAVE CONFIGURATION page.
- Please note that it is necessary to configure RMsis using an unsecured connection first.
- This will create and store the necessary database configuration.
- Additional parameters for secured connection can be added manually at a later stage.
- If the MS-SQL server does not support an unsecured connection, the test will fail and settings will not be saved.
- If this is the case, configure RMsis using any other database like Postgres first.
- This will create the <JIRA_HOME>/rmsis/conf/jdbc.properties file.
- Replace the internal database details with MS-SQL database as explained in the next steps.
- Once the configuration is saved, stop JIRA. This will stop RMsis as well.
Kill all processes related to JIRA / RMsis (they are typically named as Tomcat*, java).
This is important because sometimes stopping JIRA does not terminate all the processes.
Detailed description about killing RMsis is available at: https://optimizory.atlassian.net/wiki/x/sgkE
Locate <JIRA_HOME>/rmsis/conf/jdbc.properties file.
The contents of the file will be similar to:
db.name=rmsisDbName
jdbc.driverClassName=com.microsoft.sqlserver.jdbc.SQLServerDriver
jdbc.url=jdbc:sqlserver://localhost:1433;databaseName=${db.name}
jdbc.username=sa
jdbc.password=sa123
hibernate.dialect=org.hibernate.dialect.SQLServer2005Dialect
jdbc.dataSourceClassName=com.microsoft.sqlserver.jdbc.SQLServerDataSource
Add the desired additional parameters to the jdbc.url. For example, in order to add HTTPS/ SSL, append ;encrypt=true;trustServerCertificate=true; to the existing URL.
The updated file will be
db.name=rmsisDbName
jdbc.driverClassName=com.microsoft.sqlserver.jdbc.SQLServerDriver
jdbc.url=jdbc:sqlserver://localhost:1433;databaseName=${db.name};encrypt=true;trustServerCertificate=true;
jdbc.username=sa
jdbc.password=sa123
hibernate.dialect=org.hibernate.dialect.SQLServer2005Dialect
jdbc.dataSourceClassName=com.microsoft.sqlserver.jdbc.SQLServerDataSource
Save the contents of <JIRA_HOME>/rmsis/conf/jdbc.properties file.
- Restart JIRA. This will automatically start RMsis with the updated configuration.
Connecting RMsis to Oracle
Supported Version(s)
Currently, RMsis supports Oracle 11G and later versions.
Database Setup using Oracle
- Ensure that you have a database instance available for RMsis (either create a new one or use an existing one).
- Within that database instance, create a user which RMsis will connect as (e.g. rmsisuser).
- create user <rmsisuser> identified by <user_password> default tablespace <tablespace_name> quota unlimited on <tablespace_name>;
- Notes :
- When you create a user in Oracle, Oracle will create a 'schema' automatically.
- When you create a user, the tablespace for the table objects must be specified.
- Ensure that the user has the following permissions:
- grant connect to <rmsisuser>;
- grant create table to <rmsisuser>;
- grant create sequence to <rmsisuser>;
- grant create trigger to <rmsisuser>;
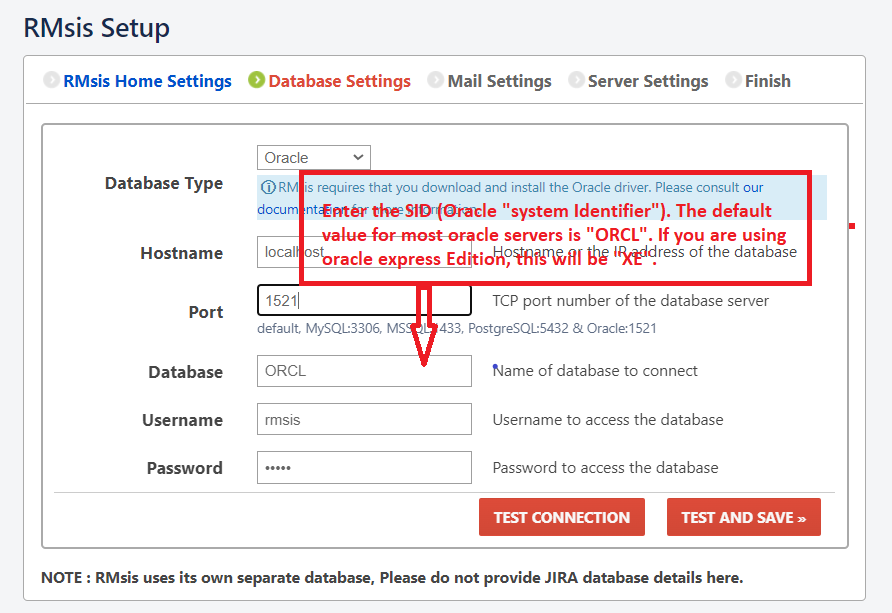
Database Configuration for Oracle
| Attribute | Value |
|---|---|
| Database Type | select "Oracle" |
| Hostname | Enter hostname or the IP address of the database |
| Port | TCP port number of the database server (by default 1521 for Oracle) |
| Database | Enter the name of the database/SID to connect (The Oracle "System Identifier". The default value for most Oracle servers is 'ORCL'. If you are using the Oracle Express Edition, this will be 'XE'.) |
| Username | Enter username to access the database |
| Password | Password to access the database. |