Reporting
- Deepak Jangid (Deactivated)
- Pritam Kumar
RMsis reporting is divided into 2 parts :
- Specific Reports : Usually, these are complex reports, which are not possible to generate through Custom Reporting feature.
- Custom Reports : Custom reports provide a flexible option to users, where they can define reports as per their need or preference.
Specific Reports
When "Specific Reports" option is selected from RMsis Tabs, the following screen opens up. User must select the desired report from the drop-down list.

Baseline Comparison Report
Key points
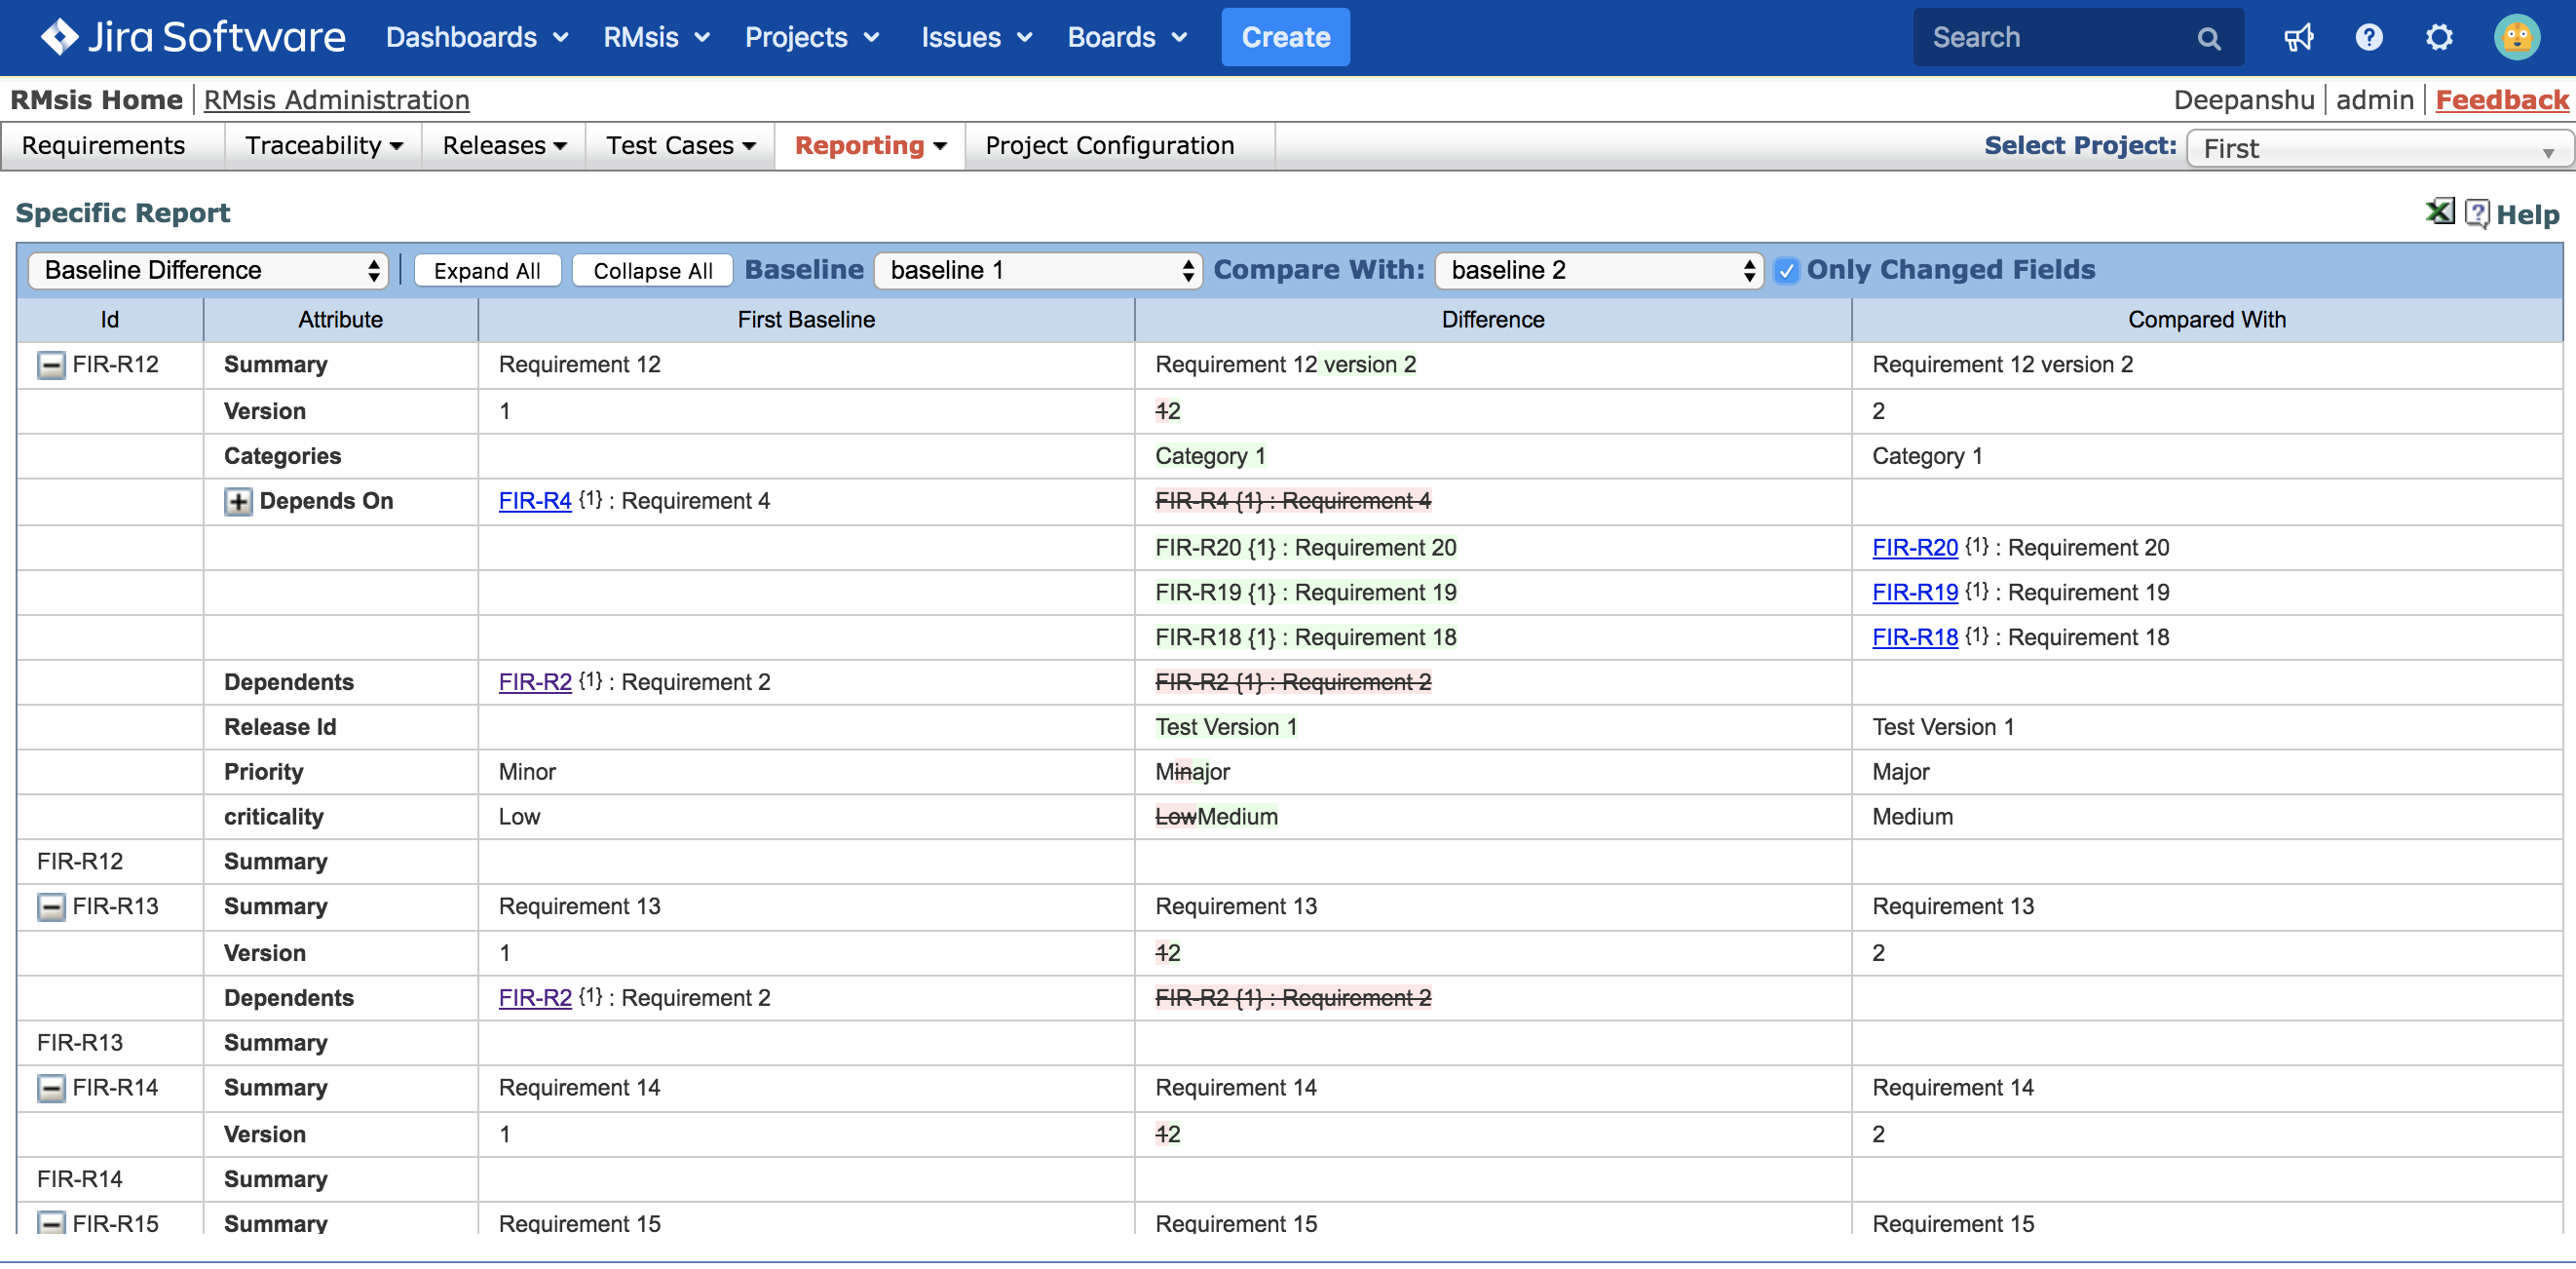
- This report can be used to compare two baselines or compare requirements in a baseline with their latest versions.
- Compare requirements in two baselines :
- In order to compare requirements in two baselines,
- Select first baseline using the "Baseline" dropdown list.
- Select second baseline using the "Compare With:" dropdown list.
- A report displaying difference in requirements between two selected baselines will be created.
- This report can also be exported in CSV format.
- In order to compare requirements in two baselines,
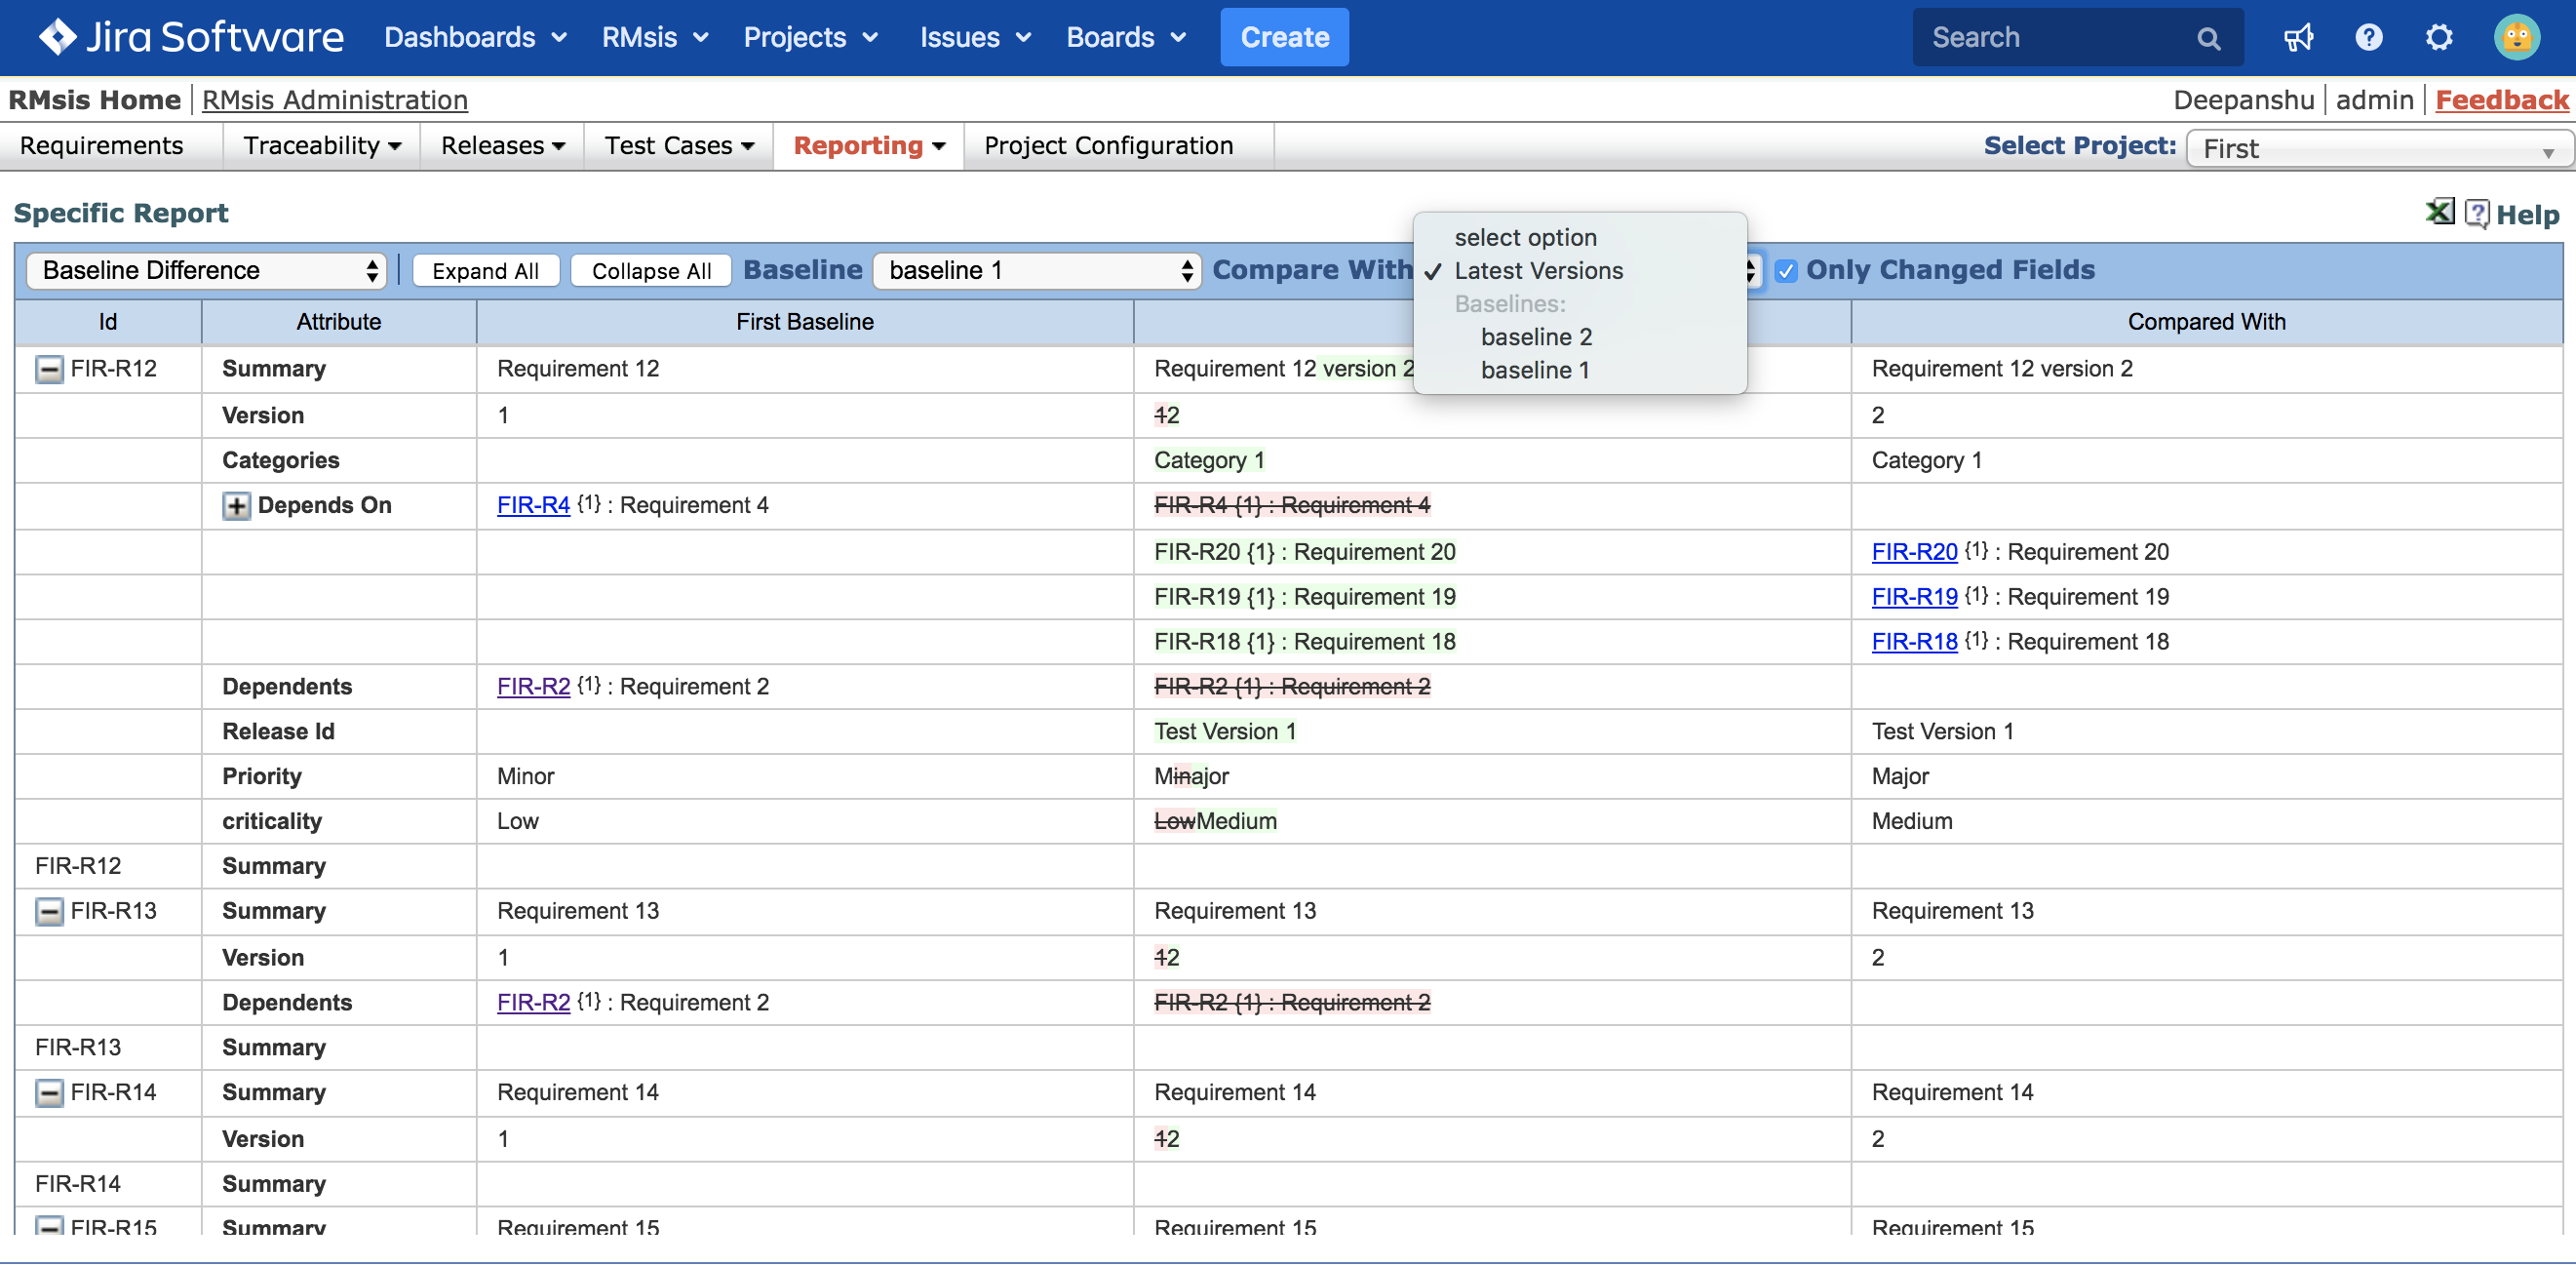
- Compare requirements in a baseline with their latest versions :
- In order to compare requirements in a baseline with their latest version,
- Select a baseline using the "Baseline" dropdown list.
- Select "Latest Versions" using the "Compare With:" dropdown list.
- A report displaying difference in requirements in the selected baseline and their latest versions will be created.
- This report can also be exported in CSV format.
- In order to compare requirements in a baseline with their latest version,
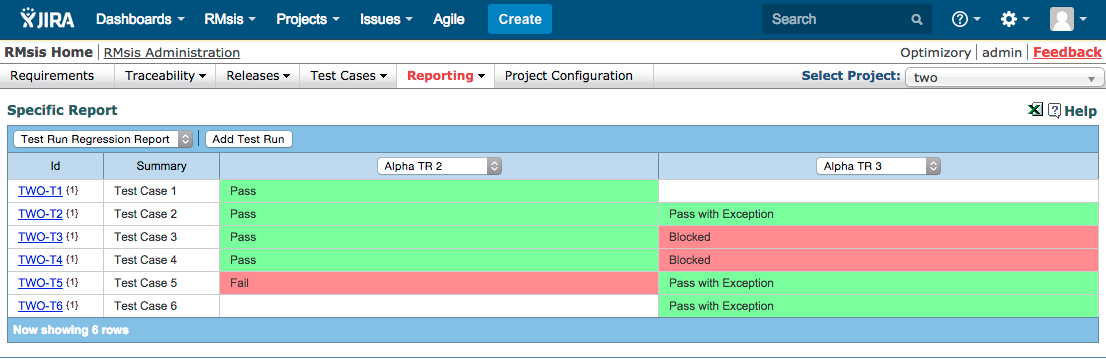
Test Run Regression Report
This report can be used to view the difference between status of various Test Cases under different Test Runs.
Activity Tracking Report
This report shows the activity/actions performed on selected attributes of requirements/ test cases in a particular time period chosen by the user.
In order to create such a report, a user can follow the below-mentioned steps :
- Click on "Configure Report" button.
- Select Domain: Fields: After selecting the domain, select the fields on which the actions/ activity performed needs to be tracked.
- Select "Requirement" if a report displaying actions performed on fields of requirements is required.
- Select "Test Cases" if a report displaying actions performed on fields of test cases is required.
- Removed: Select this checkbox if you want to track the deletion/ removal of entities.
- Start Date: Select the date from which actions/ activity needs to be tracked.
- End Date: Select the date upto which actions/ activity needs to be tracked.
The dialogue box and resulting view is presented here.
![]()
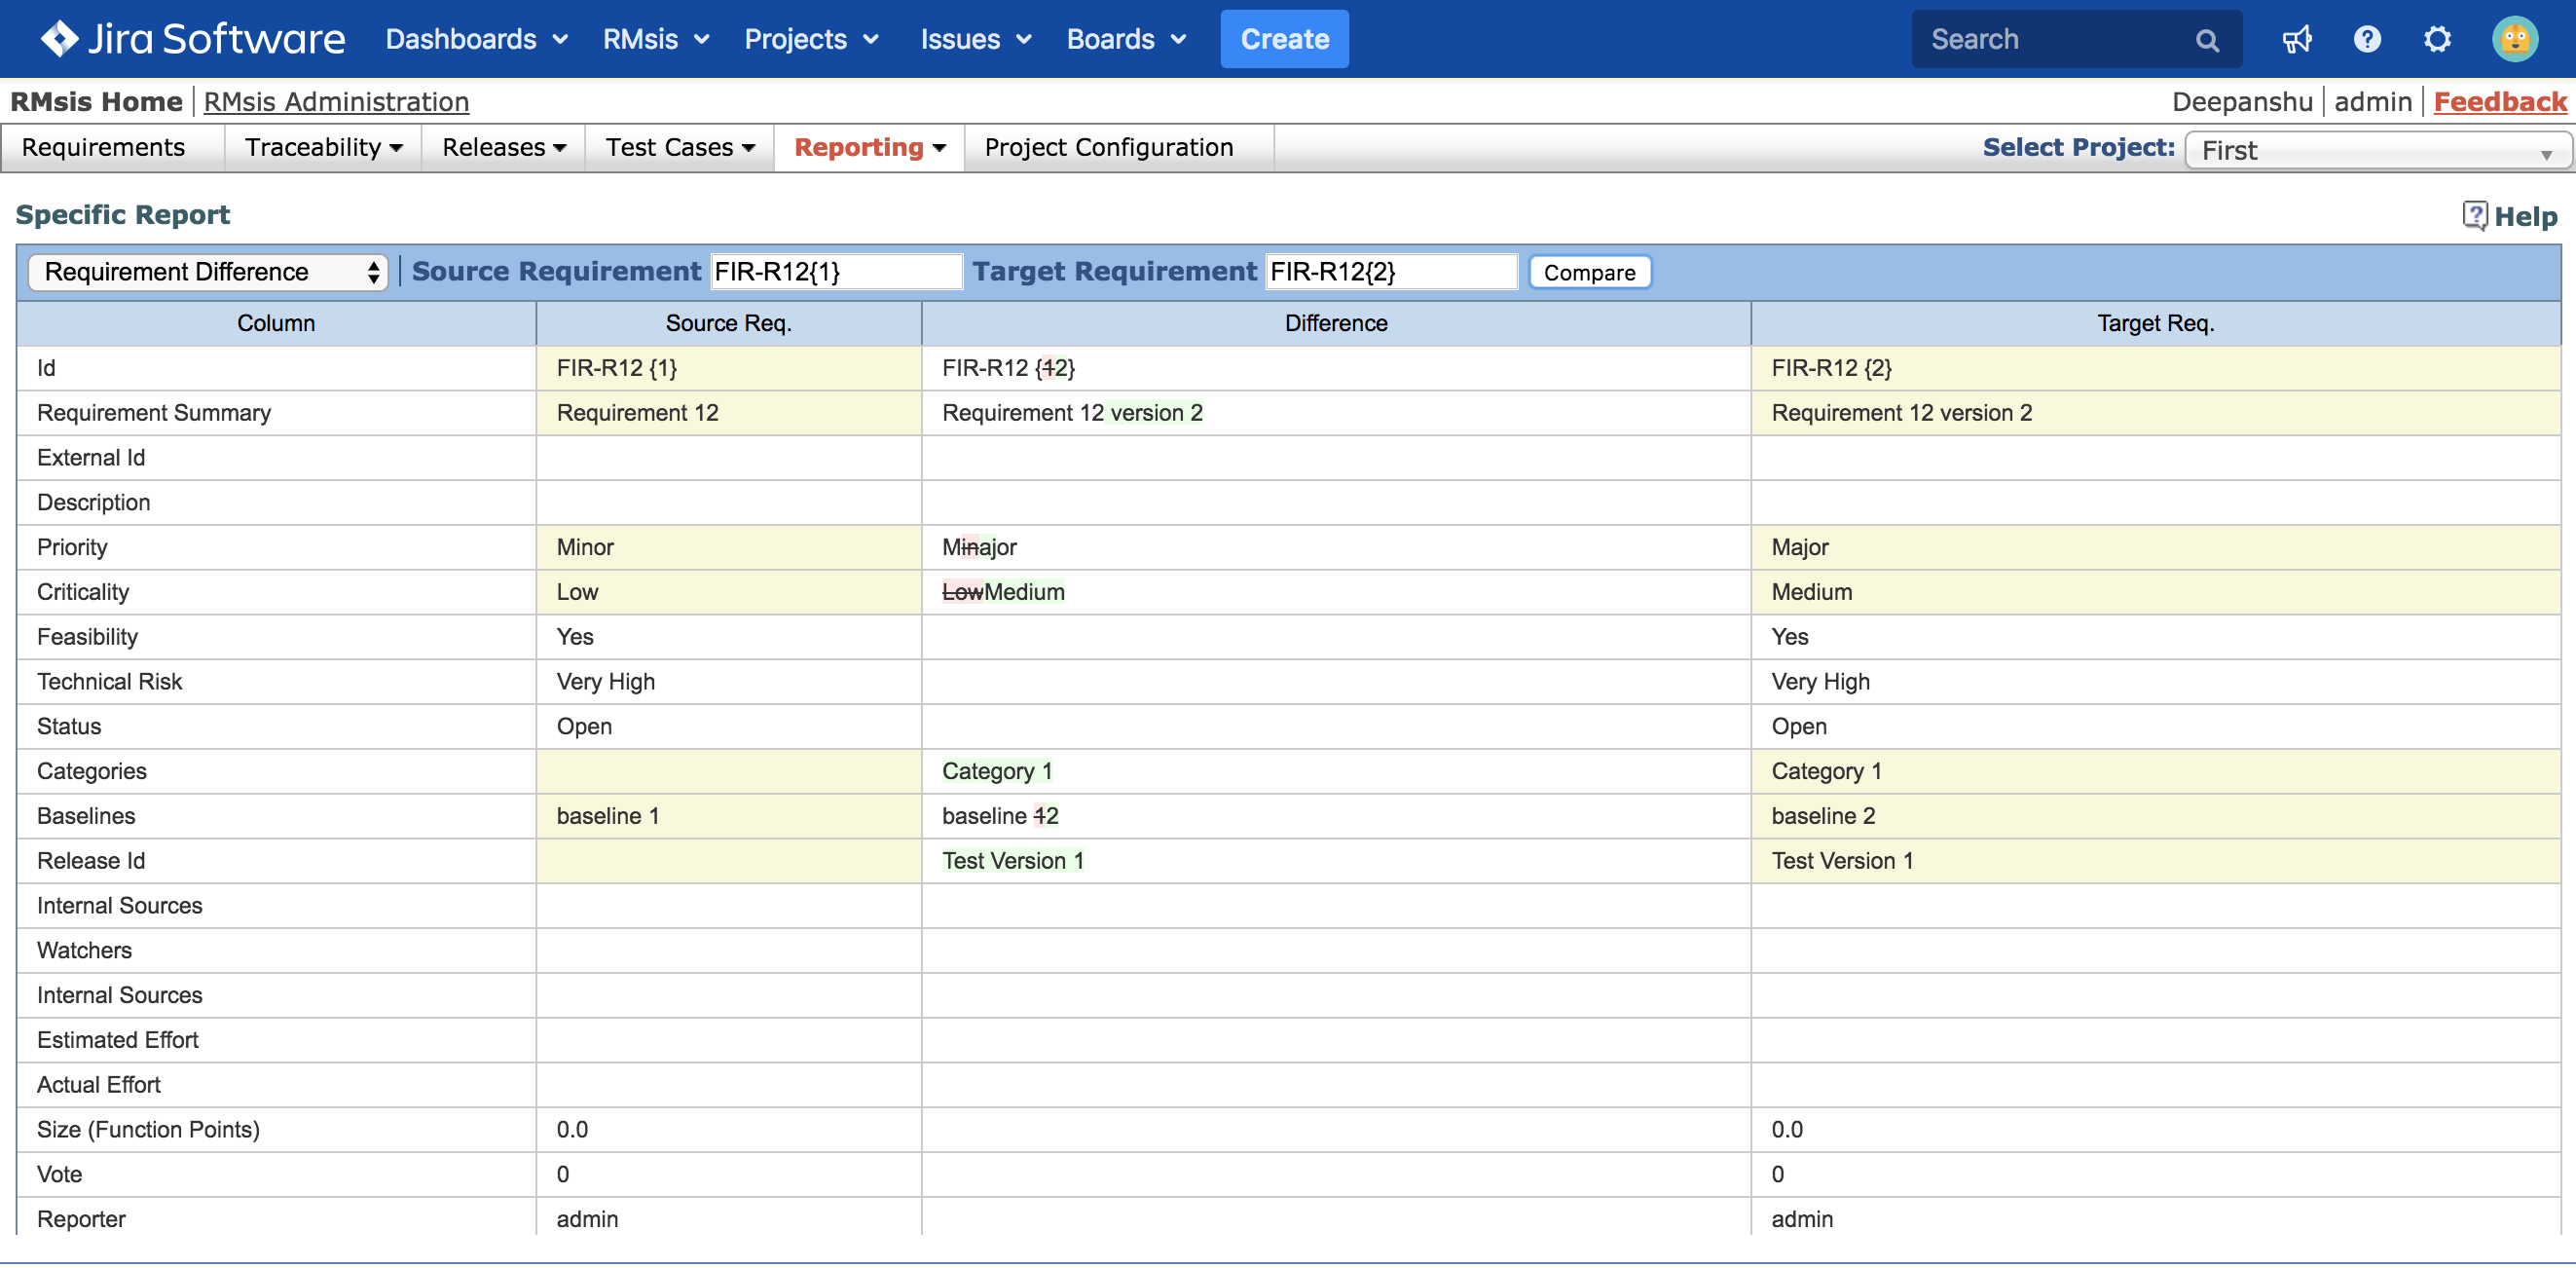
Requirement Difference Report
This report can be used to compare two requirements. In order to create such a report, a user can follow the below mentioned steps :
Enter ID of the first requirement in the "First Requirement" text box.
Enter ID of the second requirement in the "Second Requirement" text box.
Click on the "Compare" Button.
Custom Reports
Key points about custom reporting feature
- Reports can be viewed in a format similar to Pivot Table and can be exported in CSV format.
- RMsis can generate customized reports based on various domains.
- A domain denotes central OR primary entity for the report.
- For example, if "Requirement" is selected as domain, then report will treat requirement as central entity, while generating the report.
Reporting Domains
RMsis reports can be generated around the following entities :
- Basic Entities
- Requirements
- Test Cases
- Artifacts
- Group Entities
- Releases
- Test Run
In order to generate a meaningful report, selection of the appropriate domain is must. Effective use of domain and attribute can generate meaningful reports and can provide answers to some critical questions like:
- How many requirements are impacted by failed test cases in a test run?
- What is the health of release (how many tests are failing and how many requirements are impacted due to these tests)?
Reporting Operations
Following operations can be performed with reports : -
- Create Report
- View Report
- Edit Report
- Delete Report
Create Report
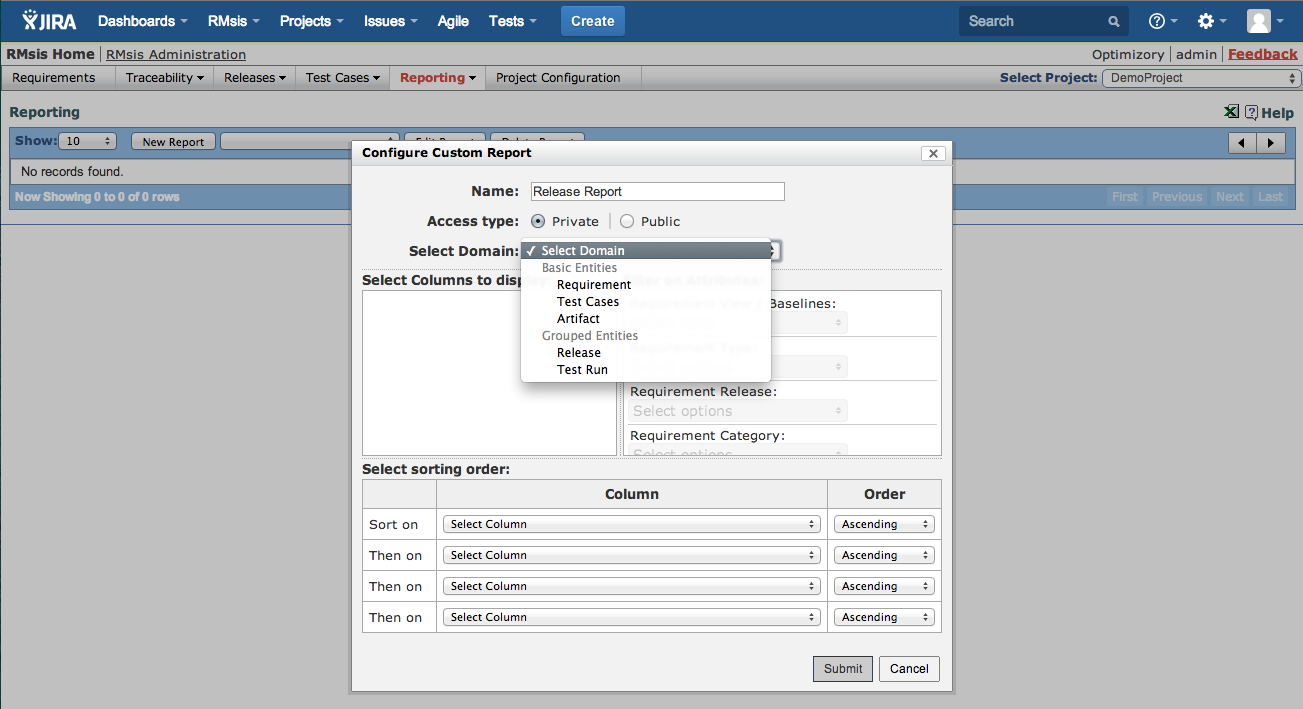
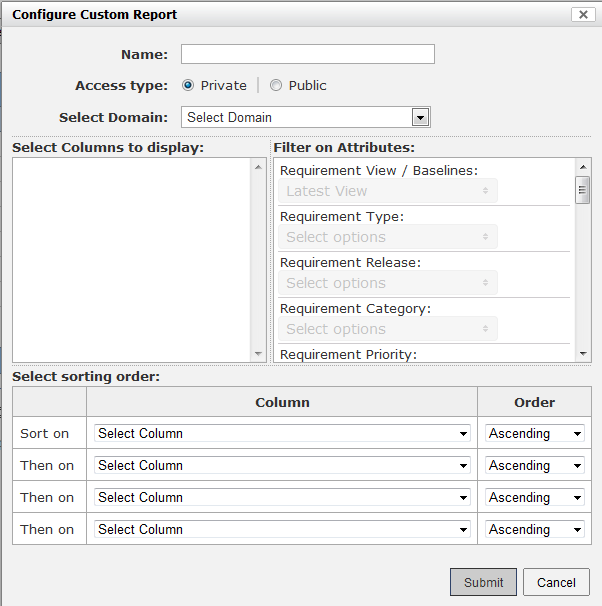
A report can be created by clicking on the "New Report" button. Upon clicking this button, a model will open up and the following information needs to be provided by the user
- Report Name: This is the name of the report to be generated. Reports can have any name upto 255 characters.
- Report Domain Selection: This is a drop down option. User can select any domain and based on domain selection, Column options will be presented.
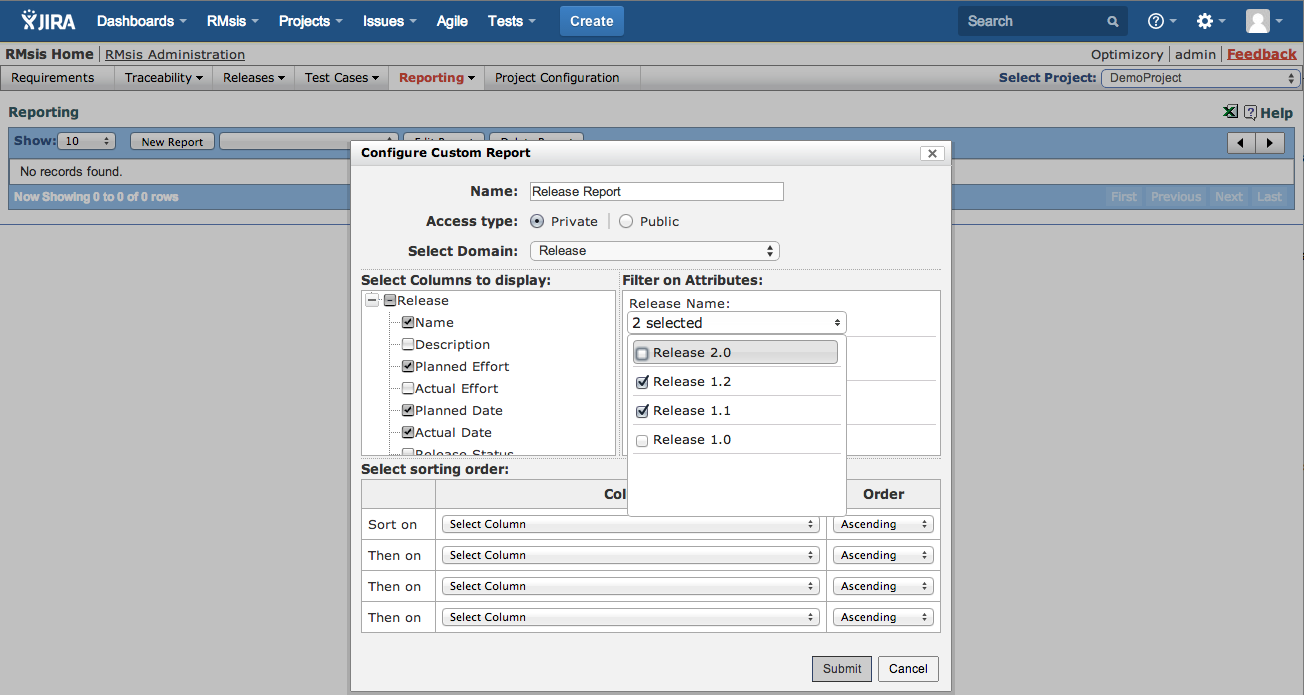
- Columns Section: Once the domain is selected, all applicable columns will be displayed in the left tree.
- For Requirements, custom columns also displayed and can be selected by the user.
- Filter Selection: Filters will be displayed on the right-hand side pane. User can choose the desired options for report generation.
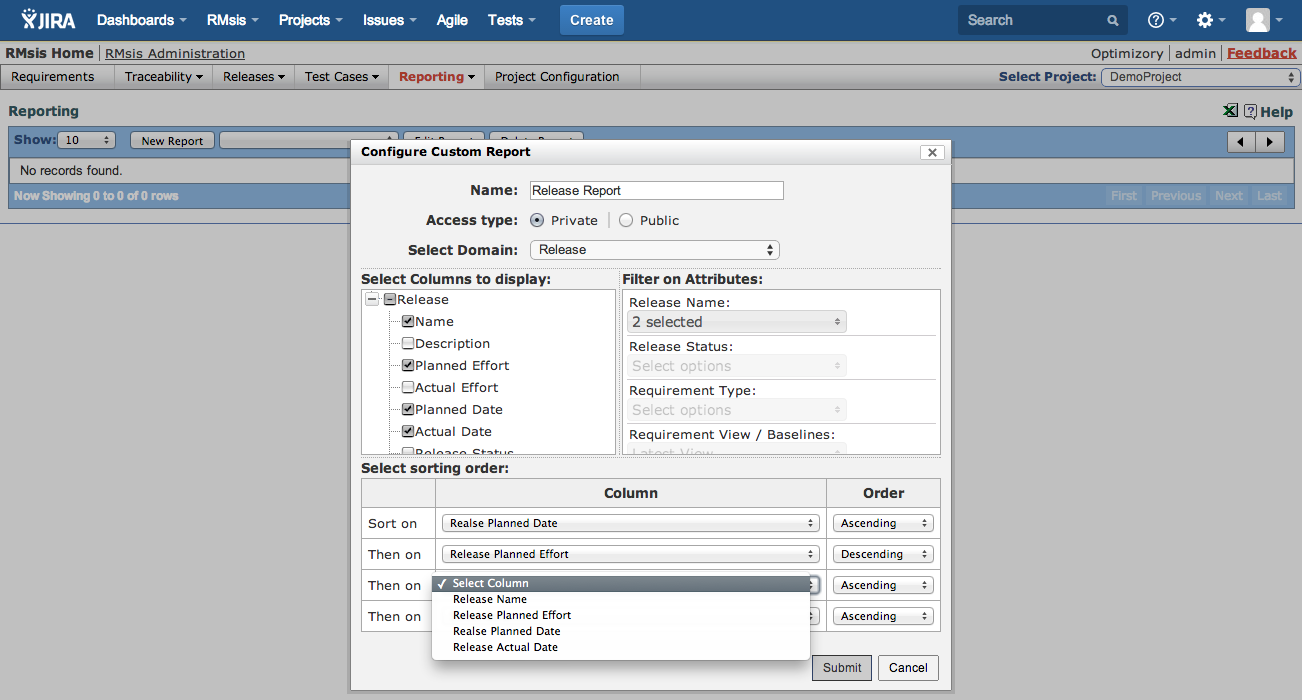
- Sorting order: Once options are chosen, the user can specify sorting order for four columns.
Following image shows a typical report name and domain selection
Following image shows selection of columns and values for filter
Following image shows selection of sorting order
View Report
A report can be viewed by selecting a named report in the drop-down list.
Edit Report
A report can be edited by selecting appropriate report in drop down and clicking "Edit Report" button. Edited report can be saved with changed domain/columns/filters/sorting order.
Delete Report
A report can be deleted by selecting appropriate report in drop down and clicking "Delete Report" button.
Public and Private Reports
- All users will have the option to create and use Private Reports.
- The Manager / Project Lead has the default permission to create Public Reports.
- This can be done by choosing the Access Type while configuring the report.
Further Reading