Requirement Operations
- Deepak Jangid (Deactivated)
Operations common to Planned and Unplanned Requirements
The following operations can be performed on "Planned Requirement" table:
- Select Requirement
- A requirement can be selected by clicking on first column of the requirement.
- Multi-select is provided and works for many operations.
- Create Requirement: A new requirement can be created by either
- clicking on the table row under the "Requirement" column labeled "< Enter new requirement >".
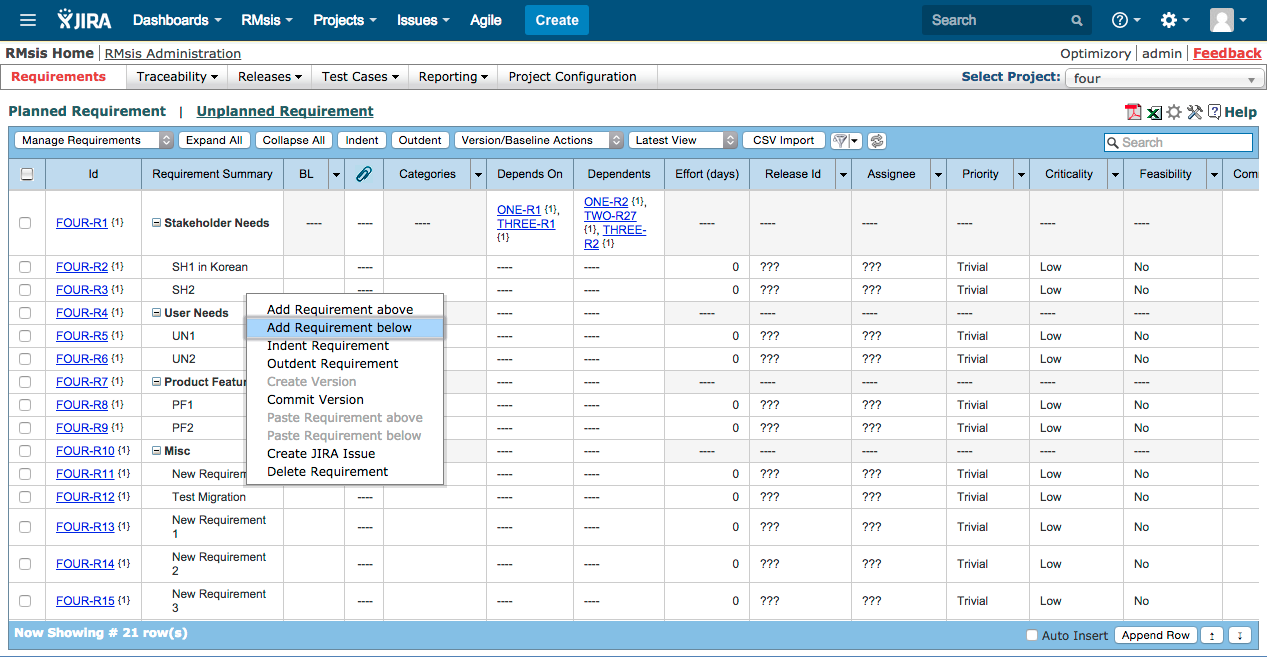
- selecting context menu item ("Add Requirement above" or "Add Requirement below").
- selecting a requirement and choosing add option ("Add Requirement above" or "Add Requirement below") from the menu bar.
- Edit Requirement:
- A requirement can be edited simply by clicking on it OR by clicking its ID.
- Please note that
- some fields of a parent requirement are non-editable.
- "Requirement Summary" and "Requirement Description" of a committed requirement cannot be edited.
- Delete Requirement:
- A requirement can be deleted by clicking on context menu item "Delete Requirement".
- Caution! if a parent requirement is deleted, then all of its children will also be deleted.
- Paste Requirement:
- A requirement can be cut from the unplanned requirements table and then pasted into the planned requirements table either:
- by selecting context menu item "Paste Requirement above" or "Paste requirement below".
- or by selecting a requirement from planned requirements table and then choosing "Paste Requirement above" or "Paste Requirement below" from the menu bar in planned requirements table.
- A requirement can be cut from the unplanned requirements table and then pasted into the planned requirements table either:
- Move:
- A Requirement can be moved, just by typing the Requirement-Id in the target row.
- Move Requirement from Unplanned to Planned:
- A requirement can be moved from "Unplanned Requirements" table to "Planned Requirements" table by
- right clicking on it. After right click, a menu appears and requirement can be moved to planned table by selecting "Move to Planned Requirements".
- or by selecting the requirement and then choosing "Move to Planned Requirements" from dropdown "More Actions".
- A requirement can be moved from "Unplanned Requirements" table to "Planned Requirements" table by
- Move to Unplanned:
- A requirement can be moved from "Planned Requirements" table to "Unplanned Requirements" table by selecting the requirement and then choosing "Move to Unplanned" from "Manage Requirements" dropdown menu.
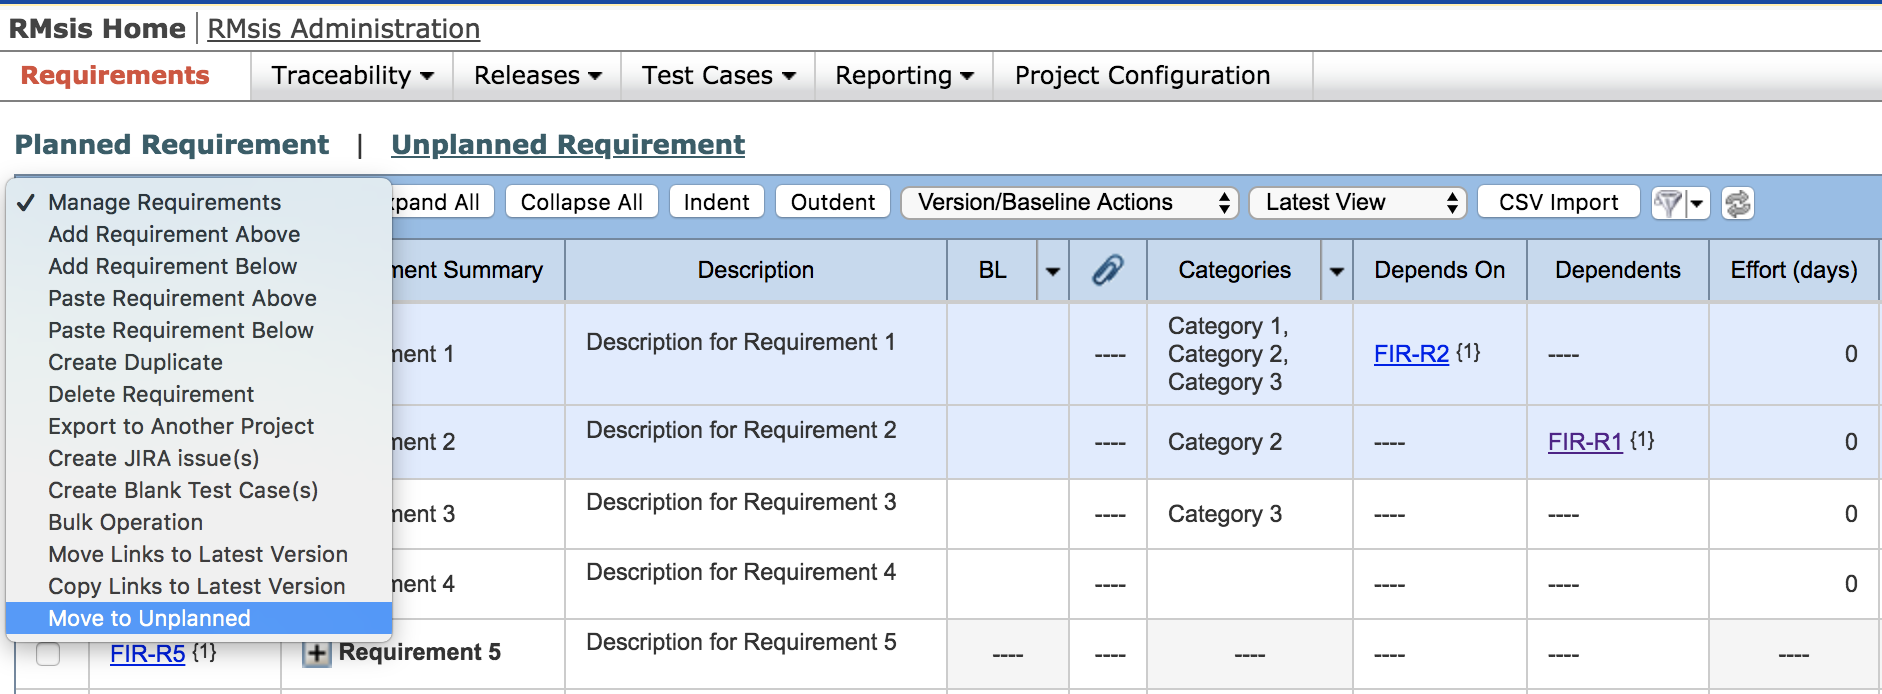
- Note :
- A requirement can not be moved from "Planned Requirements" table to "Unplanned Requirements" table if :
The requirement is linked with a release/ baseline/ test cases/ artifacts,
The requirement is a container,
The requirement is committed,
The requirement is linked with other requirements (depends on/ dependents),
The requirement is assigned to some user
The user performing the action does not have appropriate permission.
- A requirement can not be moved from "Planned Requirements" table to "Unplanned Requirements" table if :
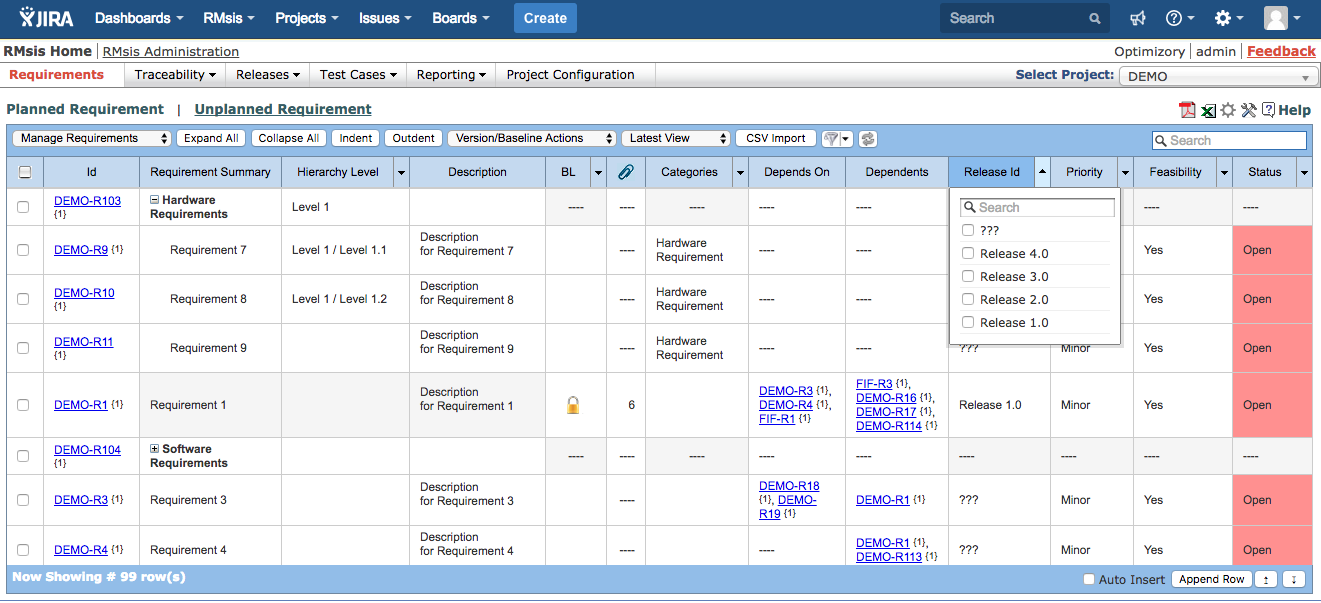
- Filters:
- Requirements can be filtered on various attributes like "Release ID", "Priority", "Criticality", "Feasibility", "Status" etc.
- Filter selection performs an OR operation within a given column and performs AND operation across columns.
- User can reset the filter to default state by using Reset Filter
- Named Filters
- Named Filters can be created and used, as described in Named Filters.
- Refresh
- A Refresh button is provided to reload the table.
- Search :
- The user can now search using
- Numeric part or complete Id
- Part of text in the text / rich text area fields like Requirement Summary, Description and custom fields using the search box provided.
- Reset Filter clears the search field as well.
- The user can now search using
- Specifying source of requirement
- Source of requirement can be specified in detailed requirement view. Refer following link for details Specifying - Source of a Requirement
- Source can also be specified using the columns "External Sources" and "Internal Sources" from the Planned Requirements table.
- Import Requirements:
- User can initiate the import process by clicking on the "CSV Import" button in the any of the Requirements Tables.
- A generic description of the functionality can be found at Generic CSV Import Function.
- Export Requirements:
- Requirements can be exported to PDF format by clicking icons shown on the top right corner.
- Planned Requirements can also be exported in CSV format.
- A partial set of requirements can be exported by selecting a set of requirements (through the checkbox) an then selecting either PDF or CSV export.
Operations Specific to Planned Requirements
- Append Requirement
- By clicking on Append row button in the Footer Bar, a Requirement can be appended to the list.
- Auto Insert
- By checking "Auto Insert" box in the Footer Bar, a new row will be automatically inserted after the current operation is complete.
- Navigate to Top / Bottom of Requirements Table
- This can be achieved by clicking on
 icons in the Footer Bar.
- This can be achieved by clicking on
- Indent Requirement: A requirement can be indented in the following two ways:
- First select a requirement and then click on indent button to indent it.
- By selecting context menu item "Indent Requirement".
- Outdent Requirement: A requirement can be outdented in the following two ways:
- First select a requirement and then click on outdent button to outdent it.
- By selecting context menu item "Outdent Requirement".
- Multi-select Options
- There is an option in the Table Header for selecting all entities as per the current filter .
- Children of any parent can be selected/ deselected using the context menu options "Select Children in filter" / "Deselect Children".
- Multi-select & Bulk Operations
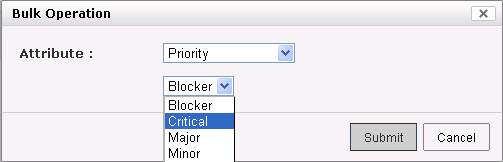
- RMsis provides a mechanism to do a bulk update of Attributes for multiple requirements.
- To achieve this, select all the requirements, whose attribute is to be modified.
- Choose Bulk Operation from the Manage Requirements drop-down.
- A dialog box will appear.
- Select the attribute and value and Submit.
- Baseline Actions:
- Accessed through Version/Baseline Actions dropdown
- Mark for Baseline: All selected requirements can be marked for baseline by selecting "Mark for Baseline" option.
- UnMark: All selected and marked requirements can be unmarked by selecting "UnMark" option.
- Create Baseline:
- All marked and selected requirements can be baselined by selecting "Create Baseline" option.
- The system will prompt for and save the Baseline Name & Description.
Link to Baseline: All selected and marked requirements can be linked with an already existing non-committed baseline by selecting "Link to Baseline" option.
Unlink From Baseline: All selected requirements can be unlinked from a non-committed baseline by selecting "Unlink From Baseline" option.
Commit Baseline: The current state of the selected baseline will be saved after using the option "Commit Baseline". Requirements cannot be linked/ unlinked to a baseline after the baseline has been committed.
Uncommit Baseline: The selected baseline will be uncommitted after using the option "Uncommit Baseline". If a committed baseline has been uncommitted using this option, requirements can be linked/ unlinked to such baseline.
- Details of implementation are available at Details of Requirements Baselining
- Version Actions:
- Accessed through Version/Baseline Actions dropdown
- Create Version:
- A new version of the requirement is created. The source requirement must be committed to perform this operation.
- This operation can be performed by selecting a requirement/ set of requirements and clicking on Create Version(s) under the Version/Baseline Actions option.
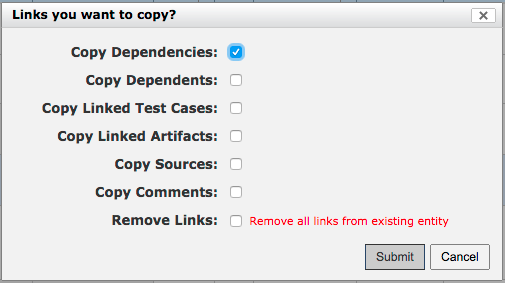
- After selecting Create Version option, a panel listing options to copy links with requirements, test cases, artifacts and removing links will open
- After selecting the appropriate options and clicking on the submit button, the new version of requirements will be created
- Selecting "Copy Dependencies", "Copy Dependents:", "Copy Linked Test Cases:" and "Copy Linked Artifacts:" will copy links of existing requirements to the new version of the requirement.
- Selecting "Copy Sources:" will copy Internal Sources and External Sources to the new version of the requirement.
- Selecting "Copy Comments:" will copy comments to the new version of the requirement.
- Selecting the "Remove Links:" will remove all links from the existing requirement version.
- Commit Version: The present state of requirement is saved.
Uncommit Version: This option can be used to uncommit the latest committed version of the requirement(s).
Note: This option will be available only if uncommit of the latest version of requirement has been enabled by the user having admin rights in RMsis from RMsis Administration > Configuration > Application
- Details of implementation are available at Requirement Versions, Baseline and History
- View Versions: This dropdown provides multiple options for viewing various versions of requirements.
- Latest View shows the latest version of all requirements.
- All Versions
- All saved Baselines.
- Expand Requirement:
- A parent requirement can be expanded by clicking on expand button associated with the requirement text but if you want to expand all requirements, then click on "Expand All" button.
- Collapse Requirement:
- A parent requirement can be collapsed by clicking on collapse button associated with the requirement text but if you want to collapse all requirements, then click on "Collapse All" button.
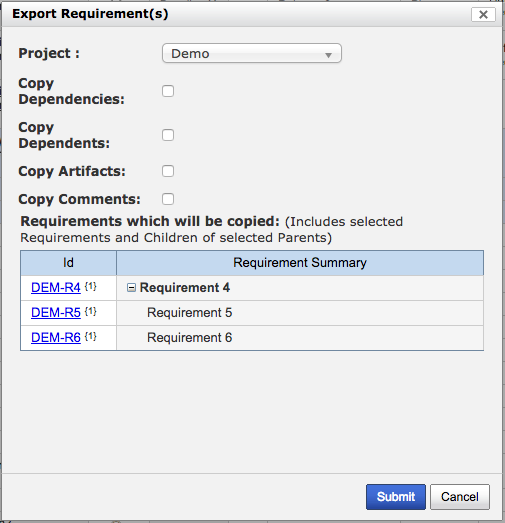
- Export Requirements to another Project
- Select the requirements you wish to export and select "Export to Another Project".
- Select the target project from the panel which appears (shown below)
- Refer this link for more details.
- Create Duplicate
- This option creates a duplicate of the selected Requirements at the end of Planned Table.
- Duplicates with unique requirement ID's can be created for any selected set of requirements.
- This operation can be performed by selecting a set of requirements and clicking on Create Duplicate under the Manage Requirements option.
- After selecting Create Duplicate option, a panel listing options to copy links with requirements, test cases, artifacts and removing links will open.
- Selecting appropriate options, and clicking on the submit button will create a duplicate set of requirement at the bottom of the table.
- Selecting "Copy Dependencies", "Copy Dependents:", "Copy Linked Test Cases:" and "Copy Linked Artifacts:" will copy links of existing requirements to the new requirement (duplicate requirement)
- Selecting "Copy Sources:" will copy Internal Sources and External Sources to the new version of the requirement.
- Selecting "Copy Comments:" will copy comments to the new version of the requirement.
- Selecting the "Remove Links:" will remove all links from the existing requirement.
- Create JIRA Issues
- There are many situations, where the users wish to create a JIRA Issue in order to implement the Requirement.
- This functionality can be used to automatically create a large number of tasks against a chosen set of Requirements, say a Baseline.
- An elaborate description of this functionality can be found at Exporting Requirements as JIRA Issues
- Create Blank Test Cases
- Users can automatically generate a set of Test Cases against the selected Requirements.
- An elaborate description of this functionality can be found at Generating set of Test Cases against Requirements.
- Move Links to Latest Version
- This functionality can be used to move the links or associations of requirement(s) with other requirements/ test cases/ JIRA issues from a previous version of the requirement to the latest version of requirement.
- After using this feature, the associations/ links of the previously selected version of the requirement will be removed and these relationships will be moved to the latest version of the requirement.
- Copy Links to Latest Version
- This functionality can be used to copy the links or associations of requirement(s) with other requirements/ test cases/ JIRA issues from a previous version of the requirement to the latest version of requirement.
- This functionality can be used to copy the links or associations of requirement(s) with other requirements/ test cases/ JIRA issues from a previous version of the requirement to the latest version of requirement.
Important Notes:
- If you are unable to perform any operation on this table, then please confirm with your administrator / manager that you have the required credentials to perform that operation.
- Context Menu is accessible by right clicking on any table row. Operations defined in context menu will be performed on that row.
- The fields categories, estimated effort, technical risk, release id, priority, criticality, feasibility, status for a parent requirement are non editable.