Generic CSV Import Function
- Deepak Jangid (Deactivated)
This section describes the Generic CSV Import Function and it is currently available for Requirements and Requirements Validation functionality. Any user with Create and Edit Permissions can import data from a CSV file.
The function has three essential steps, but some of them may be skipped, depending upon the type of data provided by the user. The import process sequence is described below using Planned Requirements Import as an example:
Importing Data into RMsis
Important : Prepare for CSV Import
- First understand the structure and validate the composition of CSV file. It should be well formed with no holes / missing data.
- Make sure that the first row contains the Column Headers (Names).
- Understand the options applicable to an attribute / column.
- Design / decide how the source data would map into RMsis Database.
- Wherever possible and required, create custom fields in RMsis.
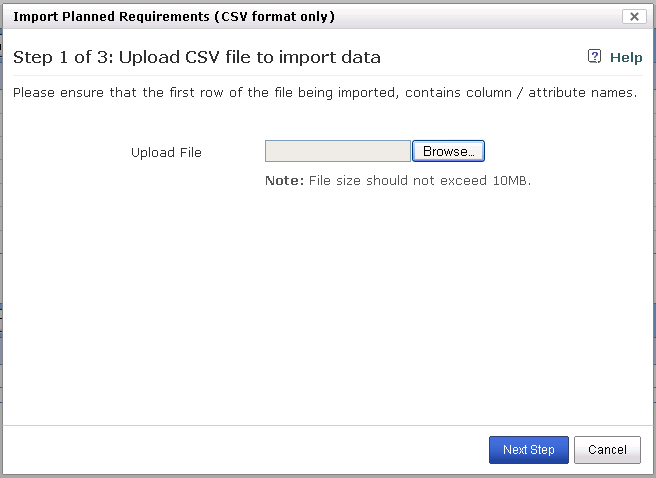
Step 1 : Specify the Input File
- Specify the file containing data in CSV format.
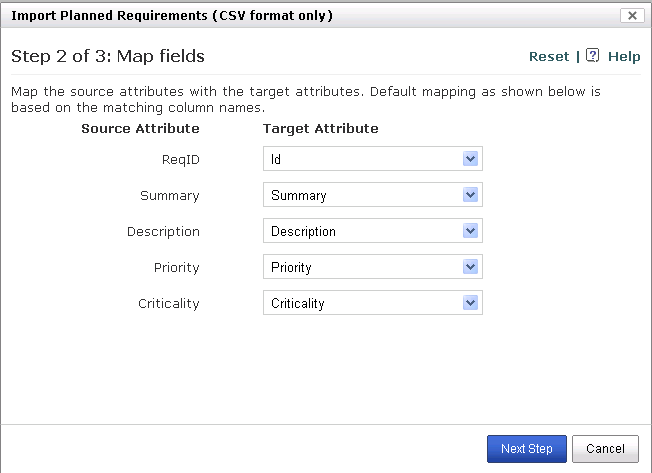
Step 2 : Map the Fields
- The fields / columns in CSV file are shown as Source Attributes
- The fields in RMsis are shown as Target Attributes.
- If you wish to ignore a Source Attribute, do not map it to a Target Attribute.
- Establish a mapping as per the design.
- Please note
- Mapping of one of the following fields is necessary:
- "Id" for Requirements and Test Cases
- or "External Id" or "Name" for Test Cases.
- If "External Id" or "Name" field has been mapped, then it can not be left blank in your CSV file.
- Please verify that the field which you are mapping is not left blank in your CSV file.
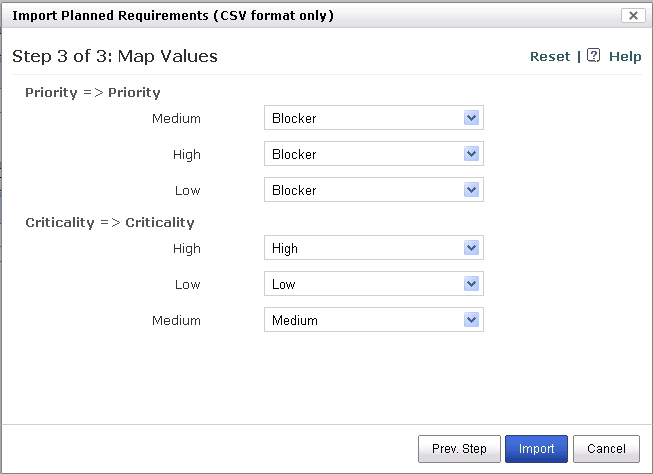
Step 3 : Map Options
- The final step is to map the values / options for each of the fields.
- Pressing Import Button populates the RMsis database and the error list is displayed in a panel.
Creating new records vs. updating records
Please note that the general philosophy is that
- If an ID [ID | Name | External ID] is not mapped to target, then a new record will be created.
- If an ID [ID | Name | External ID] is mapped to target, and If the ID exists, the existing record will be updated.
Use of ID Alias
The primary mechanism available today is to export data as CSV file and import it in another installation in the CSV format.
However, when we migrate data across installations
- the ID of entities are regenerated
- while, the traceabiliy information still refers to old ID's of entities
hence it becomes essential to store a map of the old ID's vs new ID's; so that either can be used, when required.
The CSV import process, now provides a mechanism to store old ID's as Alias. This should be selected, if the old references will be required (for example, in importing traceability).
Creating new options for Categories and Custom Lists
If the system identifies new options for Categories and Custom Lists, then the system will prompt user to either create a new option or to map it to an existing option.
Specific Information related to importing of Test Cases
- TC-ID and External-ID can not be mapped simultaneously, only one of them can be mapped at a time.
- If TC-ID is mapped and
if TC-ID column is left blank in the CSV file and other fields have been entered in CSV, then a new test case will be created.
if TC-ID already exists, then the data corresponding to this TC-ID is updated.
if TC-ID doesn't exist, then an error will be generated.
- If External-Id is mapped and
if External-ID column is left blank in the CSV file and other fields have been entered in CSV, then a new test case will be created.
if External-ID already exists, then the data corresponding to this External-ID is updated.
if External-ID doesn't exists, then a new test case will be created.
Handling of Requirement Hierarchy
The indentation levels are exported alongwith the CSV export and automatically used while importing to create Requirement Hierarchy.